Announcement
Collapse
No announcement yet.
something has gone horribly wrong piston hitting valve
Collapse
X
-
 m.qualls89
Ill post pics. Can you direct me to his manual to download? I tryed searching one earlier with no luck.
-
Forum LongTimerGSResource Superstar
Past Site Supporter
Super Site Supporter- Mar 2006
- 35853
- Torrance, CA
Originally posted by m.qualls89 View PostIll post pics. Can you direct me to his manual to download? I tryed searching one earlier with no luck.
Ed
To measure is to know.
Mikuni O-ring Kits For Sale...https://www.thegsresources.com/_foru...ts#post1703182
Top Newbie Mistakes thread...http://www.thegsresources.com/_forum...d.php?t=171846
Carb rebuild tutorial...https://gsarchive.bwringer.com/mtsac...d_Tutorial.pdf
KZ750E Rebuild Thread...http://www.thegsresources.com/_forum...0-Resurrection
Comment
-
 m.qualls89


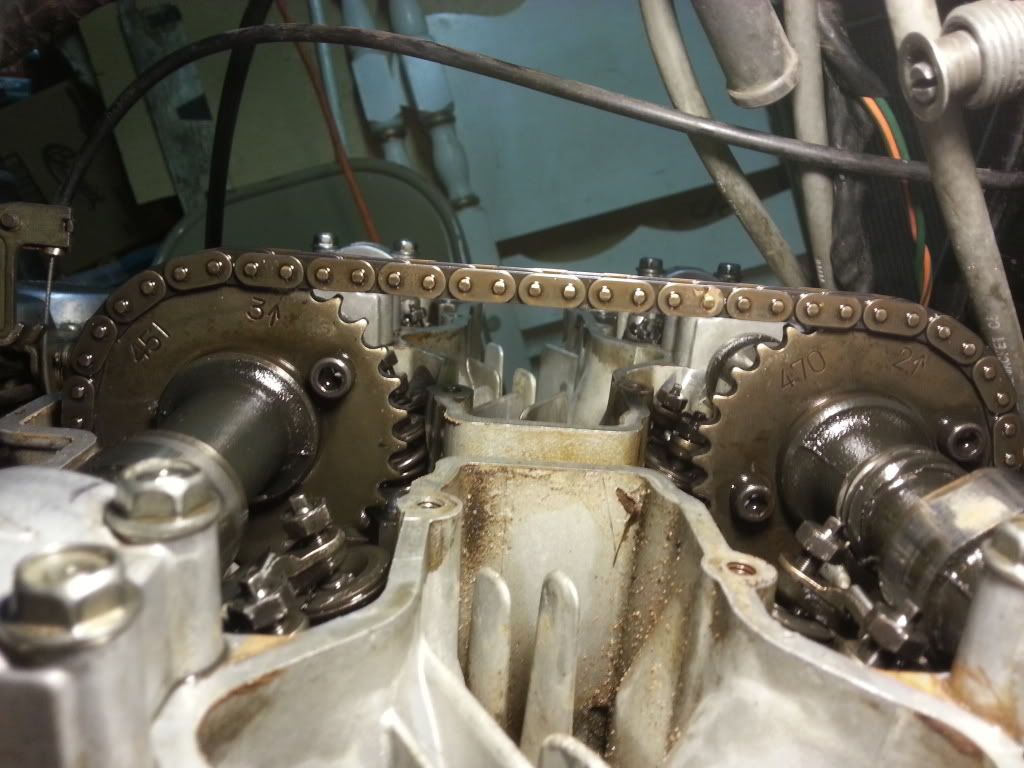
 When I timed it the 1 was in line with the gasket surface and the 2 was straight up and down as specified. Now obviously they are not. I watched the piston go up and down on each stroke and it cleared the valve the first few times so I hit the starter just bumping it slightly. It went around a few more times then hit the valve again. I'm really at a loss of how it keeps jumping time, the cam chain is still tight...
Comment
-
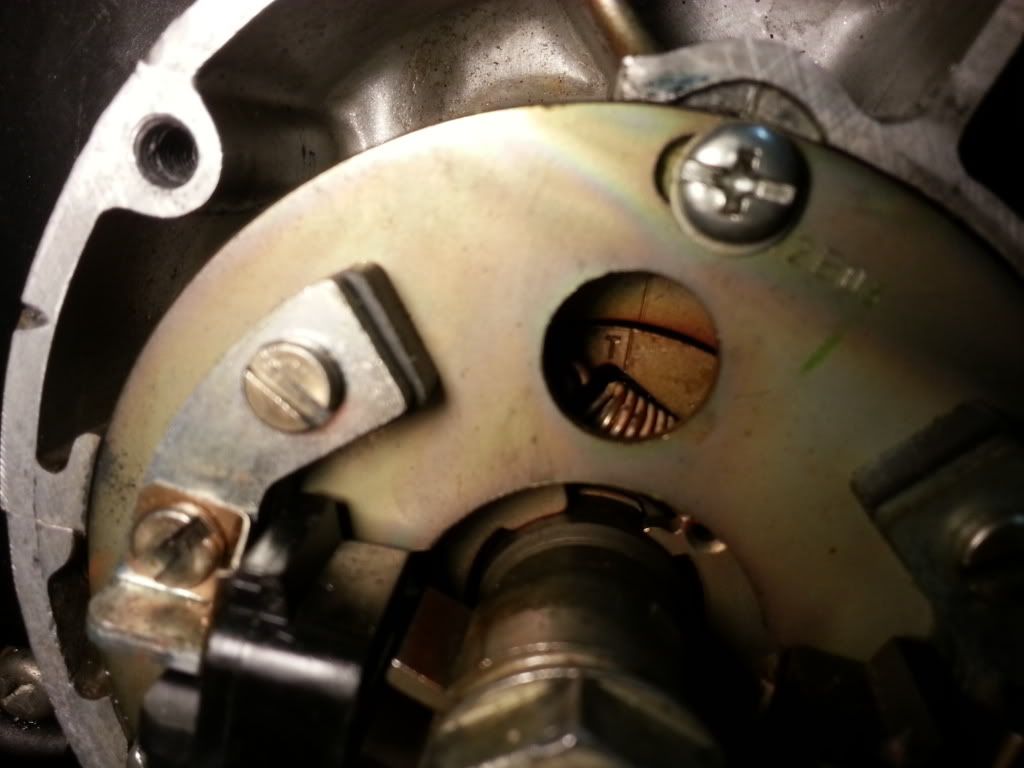
Timing is off.
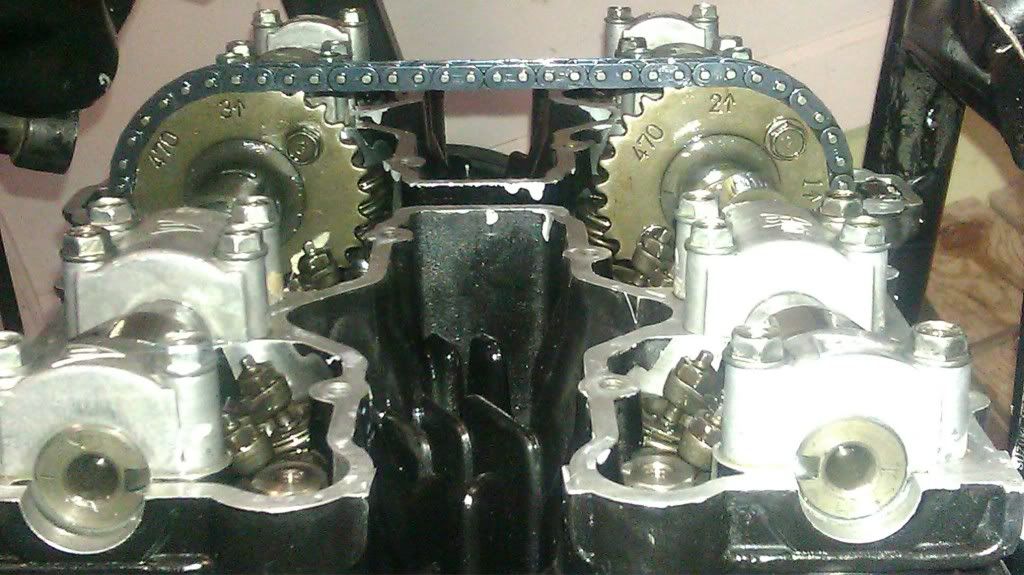
With the T mark aligned the 3 arrow and 2 arrow should be pointing Straight up, with the #1 arrow parallel to the gasket mating surface.
Nic83 GS1100ES rebuild:
http://www.thegsresources.com/_forum...d.php?t=170032
Budget GSXR Conversion:
http://www.thegsresources.com/_forum...d.php?t=200563
New to me bike: 2008 B-KING
Comment
-
In the picture it looks like you have them pointed more to 1 o'clock than 12'oclock. They should be at 12 o'clock with the T mark aligned.
Nic83 GS1100ES rebuild:
http://www.thegsresources.com/_forum...d.php?t=170032
Budget GSXR Conversion:
http://www.thegsresources.com/_forum...d.php?t=200563
New to me bike: 2008 B-KING
Comment
-

For Reference:
Nic83 GS1100ES rebuild:
http://www.thegsresources.com/_forum...d.php?t=170032
Budget GSXR Conversion:
http://www.thegsresources.com/_forum...d.php?t=200563
New to me bike: 2008 B-KING
Comment
-
 m.qualls89
That's the way I've had them twice now. But after I turn it over a few times that's how it ends up.
Comment
-
Forum LongTimerGSResource Superstar
Past Site Supporter
Super Site Supporter- Mar 2006
- 35853
- Torrance, CA
If the valves hit the pistons after you hit the starter button it's almost certain you have bent valves. I'm not sure if that's why your cams keep jumping time though.
Does the cam chain tensioner plunger spring out with force? Did you release the set screw after the tensioner was installed, and could you hear the plunger spring out?Ed
To measure is to know.
Mikuni O-ring Kits For Sale...https://www.thegsresources.com/_foru...ts#post1703182
Top Newbie Mistakes thread...http://www.thegsresources.com/_forum...d.php?t=171846
Carb rebuild tutorial...https://gsarchive.bwringer.com/mtsac...d_Tutorial.pdf
KZ750E Rebuild Thread...http://www.thegsresources.com/_forum...0-Resurrection
Comment
-
 m.qualls89
Yes the plunger springs out with force. And yesni did tighten the set screw and then loosen it a quarter turn. The chain is tight with no play in it.
Comment
-
Forum LongTimerCharter Member
GSResource Superstar
Past Site Supporter- May 2002
- 44516
- Brooksville Fl.
I can't tell exactly what your sequence is from your posts, so I'll just give you a quick summary of what it should be.Originally posted by m.qualls89 View Post

 When I timed it the 1 was in line with the gasket surface and the 2 was straight up and down as specified. Now obviously they are not. I watched the piston go up and down on each stroke and it cleared the valve the first few times so I hit the starter just bumping it slightly. It went around a few more times then hit the valve again. I'm really at a loss of how it keeps jumping time, the cam chain is still tight...
Remove spark plugs.
Remove cam chain tensioner
Remove cam shafts
Stick a quarter inch diameter dowel or similar down the #1 spark plug hole and with a 19mm wrench, rotate the crankshaft clockwise until the 1-4 T mark is aligned on the crank. The dowel should be at its highest position confirming that number 1 is at TDC. Leave the wrench hanging on the crankshaft nut. From this point on, the crankshaft must NOT move.
Install the exhaust cam with the #2 arrow pointing straight up. The slot in the right end of the exhaust cam must be aligned with the cylinder head and pointing forward (3 oclock position)
Hook the cam chain on the crankshaft sprocket and lay it over the exhaust cam sprocket leaving no slack between the crank sprocket and exhaust cam sprocket. Check that you have not moved the wrench on the crank nut and that the 1-4 T mark is still aligned.
Install the intake cam with the correct pin count and set into place with the #3 arrow pointing straight up. There should be no slack in the cam chain between the exhaust and intake cam. The slot on the end of the intake came must be aligned with the cylinder head and the slot must be at the 9 oclock position (facing rearward) All the slack in the cam chain must be between the intake cam and rearward to the crankshaft sprocket.
Check that you have NOT moved the crankshaft off the 1-4 T mark
Tighten down the cam caps incrementally so that you pull the cams down evenly and level.
Pick up the cam chain tensioner, loosen the shaft locking bolt and press the plunger all the way into the tensioner body. Lock it down in the fully retracted position. Bolt the tensioner with gasket onto the rear of the cylinder head. Then, loosen the locking bolt to release the plunger so it can take up the cam chain slack. (that is why all the cam chain slack must be on the back side of the engine) With your fingers, turn in the bolt until you feel it touch the shaft in the tensioner. Back the bolt out 1/2 turn so it is not in contact. Tighten the jamb nut while holding the bolt to be certain the bolt does NOT turn in as you lock it down.
With the spark plugs still out, rotate the engine slowly and lightly about a dozen times. If you feel any resistance, hear a clink or feel anything other than silky smoothness and quiet. STOP!
If all is seems well, bring the engine to the 1-4 T mark again with the exhaust cam end slot at 3 oclock and the intake cam end slot at 9 oclock and check that the 2 and 3 arrows on the cam shaft sprockets are still pointing straight up. If everything is still as it should be, you should be good go go.
The valves are to be adjusted with cylinder #1 at TDC, the crankshaft on the 1-4 T mark and the end slots in the cam shafts being echaust cam end slot at 3 oclock and intake cam end slot at 9 oclock. Set valve clearances for #1 intake and exhaust, #2 exhaust, #3 intake.
Rotate crankshaft 180 deg clockwise for cylinder #2 at TDC with the 2-3 T mark aligned on the crank and the end slots in the cam shafts with the exhaust cam slot at 9 oclock and the intake cam end slot at 3 oclock. (both pointing inwards) Adjust valve clearances for #2 intake, #3 exhaust, and #4 intake and exhaust.Last edited by earlfor; 05-06-2013, 12:35 AM.Komorebi-The light filtering through the trees.
I would rather sit on a pumpkin and have it all to myself than be crowded on a velvet cushion. H.D.T.
Comment
-
You need only to go back and read your earlier posts, specifically post 27 that has a link to the manual itself and references about the cam chain tensioner.Originally posted by m.qualls89 View PostIll post pics. Can you direct me to his manual to download? I tryed searching one earlier with no luck.sigpic
Steve
"The world is a book, and those who do not travel read only one page." :cool:
_________________
'79 GS1000EN
'82 GS1100EZ
Comment
-
Yes on the pull the cam chain tight from the FRONT of the engine and keep tight tension on it as you align the 3 arrow on the intake cam...ALL slack should be transfered to the back of the engine where the cam chain tensioner should then apply and take up tightening the slack out.
Reverify that the "T" mark is still on..the 1arrow is paralell to the gasket surfaceand 2 arrow is as shown in Nics picture..and arrow 3 is as shown.
If these all are checking out, then I see no reason the timing wouldnt be correct..or any reason the chain should be jumping time.MY BIKES..1977 GS 750 B, 1978 GS 1000 C (X2)
1978 GS 1000 E, 1979 GS 1000 S, 1973 Yamaha TX 750, 1977 Kawasaki KZ 650B1, 1975 Honda GL1000 Goldwing, 1983 CB 650SC Nighthawk, 1972 Honda CB 350K4, 74 Honda CB550
NEVER SNEAK UP ON A SLEEPING DOG..NOT EVEN YOUR OWN.
I would rather trust my bike to a "QUACK" that KNOWS how to fix it rather than a book worm that THINKS HE KNOWS how to fix it.
Comment
-
Just a refresher recap...it was running and riding and you decided to just adjust the valves. No new cam chain, no lower end rebuild..just rebuilt the tensioner..right? So there is no chance the cam chain was replaced and its maybe 1 link too short or 1 too long....right?
So in summary, with all the parts that it was running on before, it wont hold time now..HMMM.MY BIKES..1977 GS 750 B, 1978 GS 1000 C (X2)
1978 GS 1000 E, 1979 GS 1000 S, 1973 Yamaha TX 750, 1977 Kawasaki KZ 650B1, 1975 Honda GL1000 Goldwing, 1983 CB 650SC Nighthawk, 1972 Honda CB 350K4, 74 Honda CB550
NEVER SNEAK UP ON A SLEEPING DOG..NOT EVEN YOUR OWN.
I would rather trust my bike to a "QUACK" that KNOWS how to fix it rather than a book worm that THINKS HE KNOWS how to fix it.
Comment
-
 m.qualls89
Yes. Wish I had left it alone lol.Originally posted by chuck hahn View PostJust a refresher recap...it was running and riding and you decided to just adjust the valves. No new cam chain, no lower end rebuild..just rebuilt the tensioner..right? So there is no chance the cam chain was replaced and its maybe 1 link too short or 1 too long....right?
So in summary, with all the parts that it was running on before, it wont hold time now..HMMM.
Comment
-
Forum LongTimerBard Award Winner
GSResource Superstar
Past Site Supporter- Jul 2005
- 15156
- Marysville, Michigan
.png)

.png)
Comment