Announcement

Collapse
No announcement yet.

Help reading plug chops & jetting - '77 GS750 pipe + K&N

Collapse
X
 
  • Filter
  • Time
  • Show
Clear All
new posts

    Help reading plug chops & jetting - '77 GS750 pipe + K&N

    I did my first plug chop yesterday, as I felt the bike should definitely be a little faster, and I have been changing needles, needle heights, and trying to get the right jets into it. Before it seemed too lean on the 105 mains from 3/4 to full throttle (peak power at 3/4 throttle), and I have since rebuilt the carbs, ditched the stock airbox with foam filter for a pair of K&N dual oval RC2222 open element filters, retaining the same 4-1 exhaust with free flowing baffle. I had swapped needles around just trying to get a good feel for the powerband and flat spots. Got it fairly good for now but not perfect (pilot screw/jet changes to play with).

    From 3/4 to full throttle, it wasn't much of a noticeable power increase while twisting the throttle but more than the previous incarnation of the bike, so I figured something was still off with the main jet sizing. I was ready to take out the 122.5 main jets and swap in 125's after looking at the top of the plug after a WOT chop reading, as I hear that is a common size to put in a modified GS750. Today I am reading that the WOT plug chop must be read at the base of the insulator, requiring the plug to definitely be physically cut to see clearly for the WOT reading.

    On plugs that I have been running all year (but just cleaned them a few hundred miles ago, but not terribly thoroughly at the base of the insulator!), running wide open throttle for 30 seconds up a long desolate hill in the countryside (took me an hour of cruising to find an appropriate straight desolate uphill road where I don't have to worry about hitting 115mph in a short blast, sheesh), I hit the kill switch and the clutch simultaneously. I don't think I closed the throttle immediately though, but I only saw this mentioned on the bike cliff plug chop instructions, not the jets r us page http://www.jetsrus.com/FAQs/FAQ_spark_plugs.htm


    looks like my mains are a slight bit too large I suspect, as long as the open throttle as the engine spun to a stop with kill switch in the off position didn't taint the reading, same for not having new plugs. Is the base only colored by deposits from wide open throttle positions? The Jets R Us link shows that, idle is at the top of the insulator, mids in the middle, WOT at the base

    The center plug from that link in this photo is the correct AFR at the base of the insulator according to jets r us, and mine looks like 2 to the left but a little darker on the base. the shiny marks are where my bandsaw blade hit the carboned up area and scraped off the deposits, so ignore that. Think a 120 is in order? or is it a wise choice to pick up 120's and 117.5's?
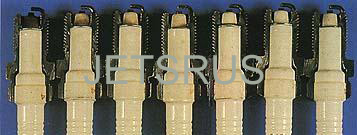


    EDIT: also found this - http://www.xs11.com/xs11-info/tech-t...ttle-chop.html and unfortunately locally no one has a full matching set of 120's in stock! I did grab some EBC/RD 117.5's for $10 just for the heck of it to test. When I do the big big bore upgrade this winter, they may work well for that if they don't now. pending rain this evening, so I will test them another day.
    Last edited by Chuck78; 07-16-2013, 08:35 PM.
    '77 GS750 920cc heavily modded
    '97 Kawasaki KDX220R rugged terrain ripper!
    '99 Kawasaki KDX220R​ rebuild in progress
    '79 GS425stock
    PROJECTS:
    '77 Suzuki PE250 woods racer
    '77 GS550 740cc major mods
    '77 GS400 489cc racer build
    '76 Rickman CR1000 GS1000/1100
    '78 GS1000C/1100

    #2
    To complicate things further, I suspect I am a little lean around the transition from the pilot circuit to the needle. I was feeling like it was too rich on the pilot screws at 1-1/4+ turns out, idle would become erratic after 30 seconds (starting to foul?), but at 1-1/8 turns it runs pretty steady but is harder starting and I get an occasional lean pop out of the carbs - especially #1, maybe fuel levels need checked? Air screws showed best colortune flame at 1-7/8 with 1-1/4 on the fuel screws. at 1-1/8 on the fuel screws, I set the air screws by ear at 1-3/4. I set the floats to 78-79 spec at 24mm, and had fuel pouring out of #4. it's +/-1mm, so when I swapped a good used needle seat in (replaced needle valves already with new), I set the floats to 25mm because I feared that it didn't have enough pressure on the seat to shut off the fuel as the float at 24 was nearly hitting the carb body. 77 spec was 26mm but I have 78-79 spec #15 pilot jets and 1.5 cutaway slides vs the 1977 22.5 pilot and much larger slide cutaway spec of 2.2 or something. I have not physically checked the fuel height with an adapter and hose,nor have I vacuum synched the carbs due to a dent in the exhaust that I was afraid would affect that cylinder's synch. maybe not at low engine speeds during synch? 15%+ restricted on one cylinder.

    I am reading a list of lean symptoms, and this popped out:
    Engine surges or "hunts" when cruising at part throttle
    If I'm on the throttle just a little into the needle range, it seems fine, but if I let off a very slight bit while cruising at 4500-ish, the engine sound jumps around a lot which this sentence above seemed to describe pretty well. This led me to think that either the 1/16th turn out on the fuel screws that I suspect I need may actually be a bigger jump than I thought, or else the stock needle in the 4th position from the top still doesn't start the taper quite soon enough to compensate for how much air these unique and very large K&N filters flow, and I need to stick my nose in the Mikuni needles chart again and find one that starts tapering slightly sooner? Or else raise this one up to the highest position and hope that the upper midrange doesn't richen too much?

    I should also add that the previous owner said "the motor's been bored out" but didn't know anything about the bike that he received from his buddy as repayment of a debt. Looking in the plug hole, they appear to be GS850 pistons, not Wiseco's as I had hoped, but they even could just be GS750 65mm+1.0mm oversized pistons. Who knows, but I suspected 850's as the bike was really darn fast for just having a MAC 4-1 and a 105 main.
    Last edited by Chuck78; 07-16-2013, 05:36 PM.
    '77 GS750 920cc heavily modded
    '97 Kawasaki KDX220R rugged terrain ripper!
    '99 Kawasaki KDX220R​ rebuild in progress
    '79 GS425stock
    PROJECTS:
    '77 Suzuki PE250 woods racer
    '77 GS550 740cc major mods
    '77 GS400 489cc racer build
    '76 Rickman CR1000 GS1000/1100
    '78 GS1000C/1100

    Comment


      #3
      Anybody????
      '77 GS750 920cc heavily modded
      '97 Kawasaki KDX220R rugged terrain ripper!
      '99 Kawasaki KDX220R​ rebuild in progress
      '79 GS425stock
      PROJECTS:
      '77 Suzuki PE250 woods racer
      '77 GS550 740cc major mods
      '77 GS400 489cc racer build
      '76 Rickman CR1000 GS1000/1100
      '78 GS1000C/1100

      Comment


        #4
        I believe 120's would be right for you altitudes.
        sigpic
        Steve
        "The world is a book, and those who do not travel read only one page." :cool:
        _________________
        '79 GS1000EN
        '82 GS1100EZ

        Comment


          #5
          Go the 125s and see how it works. You can always go smaller if that's what it needs, but I don't think so at basically sea level in Ohio.


          What method did you use to set the pilot fuel screws?

          It should be able to idle well just about forever if the fuel and air screws are both adusted correctly.
          http://img.photobucket.com/albums/v5...tatesMap-1.jpg

          Life is too short to ride an L.

          Comment


            #6
            I had the fuel screws a bit too rich at 1-1/4 (trying to make the transition to the needle circuits smoother), but it would only idle okay for about 30 seconds and then start to foul and stumble and drop rpm's. I am at about 1-1/8 turn out on the fuel screws now. Once warmed up, it will idle all day long, but doesn't do so well for the first few minutes of warm up. I have been told that VM's on GS's are just prone to acting up until warmed up. Maybe so, or maybe I am just not tuning them right.

            I used the Gunson ColorTune plug to adjust the air screw from there for a perfect blue flame, but due to time constraints, I just did one cylinder and then set the rest to that approximate setting. The air screw at the setting to give the best looking flame color did not seem to change the engine rpm much at all, although the color of the flame did change. This confused me, and made me think that I am still off a bit on the fuel screw setting.

            I also got the bike to hiccup a little out the cyl 1&2 shared air filter at least twice (slight popping backfire?), which I had read was a symptom of a lean mixture, but maybe I am confusing my symptoms and causes. Other than that, I was thinking I should have taken advice from the guys on here that said start at 5/8 of a turn out on the fuel screws, or the VM Carb Rebuild Tutorial on the GS site which says 1 turn. I thought with these incredibly free flowing air filters and exhaust, that I would need a lot more fuel. I think I am probably still too rich at idle, and I think my mains are still needing to drop from 122.5 down to 120's. I am afraid to just jump down to the 117.5's that I have without first doing a plug chop on the 120's that I have yet to acquire.
            '77 GS750 920cc heavily modded
            '97 Kawasaki KDX220R rugged terrain ripper!
            '99 Kawasaki KDX220R​ rebuild in progress
            '79 GS425stock
            PROJECTS:
            '77 Suzuki PE250 woods racer
            '77 GS550 740cc major mods
            '77 GS400 489cc racer build
            '76 Rickman CR1000 GS1000/1100
            '78 GS1000C/1100

            Comment


              #7
              THIS FROM JETSRUS.COM SEEMS TO INDICATE I NEED A 17.5 PILOT! JUST ORDERED 120 MAINS!!!:

              If unable to obtain a smooth idle with pilot screw, increase the pilot/slow jet until a smooth idle can be obtained. A larger pilot/slow jet will eliminate or reduce popping that occurs when letting off wide open throttle. The pilot/slow jet will also improve cold weather starts. Go up 1 pilot/slow jet at a time, don't skip sizes. After installing a larger pilot/slow jet, re-adjust the pilot screw. Now take it out and test ride at 1/4 throttle. If the pilot/slow jet is correct it will be easy to maintain a steady speed. Lean symptoms - if the bike surges, carb spits when throttle is opened, exhaust backfires or pops when throttle is closed, or the engine has trouble idling down, engine needs a larger pilot or slow jet to correct. If the engine idles rough, fouls plugs, or is hard to start, pilot is to big, or rich.

              I have less but still persistent popping when closing from WOT down to minimal throttle position, and although it starts with the choke on 3/4 to full on most of the time on the first kick, it won't run well for several minutes with the choke off until it warms up.

              I thought maybe I was fine with #15 pilots, but now i am confused. 120 mains are on the way however.

              Is it best to tune from WOT and main jet sizing and then work your way down the rpm range? JetsRUs.com say to start with idle, then pilot jet, then main, then needle and midrange.
              '77 GS750 920cc heavily modded
              '97 Kawasaki KDX220R rugged terrain ripper!
              '99 Kawasaki KDX220R​ rebuild in progress
              '79 GS425stock
              PROJECTS:
              '77 Suzuki PE250 woods racer
              '77 GS550 740cc major mods
              '77 GS400 489cc racer build
              '76 Rickman CR1000 GS1000/1100
              '78 GS1000C/1100

              Comment


                #8
                Those plugs look good except for the main which is lean.
                1983 GS 1100E w/ 1230 kit, .340 lift Web Cams, Ape heavy duty valve springs, 83 1100 head with 1.5mm oversized SS intake valves, 1150 crank, Vance and Hines 1150 SuperHub, Star Racing high volume oil pump gears, 36mm carebs Dynojet stage 3 jet kit, Posplayr's SSPB, Progressive rear shocks and fork springs, Dyna 2000, Dynatek green coils and Vance & Hines 4-1 exhaust.
                1985 GS1150ES stock with 85 Red E bodywork.

                Comment


                  #9
                  Originally posted by Chuck78 View Post
                  Is it best to tune from WOT and main jet sizing and then work your way down the rpm range?
                  Yes......

                  And it looks like your main jetting is a bit too large.
                  De-stinking Penelope http://thegsresources.com/_forum/sho...d.php?t=179245

                  http://www.thegsresources.com/_forum...35#post1625535

                  Comment


                    #10
                    Originally posted by Chuck78 View Post
                    I used the Gunson ColorTune plug to adjust the air screw from there for a perfect blue flame, but due to time constraints, I just did one cylinder and then set the rest to that approximate setting.
                    I love it.

                    You have the perfect tool, but not the time to use it?

                    The rest of us have to GUESS and strain to listen to changes in engine speed, while you have the perfect tool to look inside the engine and adjust the mixture PERFECTLY, then choose to ignore it and guess about the rest of the carbs.

                    Just keep in mind, while you do that, not all carbs are exactly the same. The settings that work for one carb won't necessarily be the settings that work for the next carb.


                    Originally posted by chef1366 View Post
                    Those plugs look good except for the main which is lean.
                    Originally posted by rustybronco View Post
                    And it looks like your main jetting is a bit too large.
                    Decisions, decisions.

                    .
                    sigpic
                    mine: 2000 Honda GoldWing GL1500SE and 1980 GS850G'K' "Junior"
                    hers: 1982 GS850GL - "Angel" and 1969 Suzuki T250 Scrambler
                    #1 son: 1986 Yamaha Venture Royale 1300 and 1982 GS650GL "Rat Bagger"
                    #2 son: 1980 GS1000G
                    Family Portrait
                    Siblings and Spouses
                    Mom's first ride
                    Want a copy of my valve adjust spreadsheet for your 2-valve per cylinder engine? Send me an e-mail request (not a PM)
                    (Click on my username in the upper-left corner for e-mail info.)

                    Comment


                      #11
                      Originally posted by Steve View Post

                      Decisions, decisions.

                      .
                      Then decide....

                      In depth article on how to read spark plugs - learn about how to read air / fuel mixture, timing and other tell-tale signs for optimum performance.


                      Terry Wise sent these in, they are from his BBC, AR3933's a little rich, but real close.
                      De-stinking Penelope http://thegsresources.com/_forum/sho...d.php?t=179245

                      http://www.thegsresources.com/_forum...35#post1625535

                      Comment


                        #12
                        I didn't realize the plug was cut so far to the bottom.
                        Dale is probably right.
                        I cut my plugs so you can see all the porcelain.
                        1983 GS 1100E w/ 1230 kit, .340 lift Web Cams, Ape heavy duty valve springs, 83 1100 head with 1.5mm oversized SS intake valves, 1150 crank, Vance and Hines 1150 SuperHub, Star Racing high volume oil pump gears, 36mm carebs Dynojet stage 3 jet kit, Posplayr's SSPB, Progressive rear shocks and fork springs, Dyna 2000, Dynatek green coils and Vance & Hines 4-1 exhaust.
                        1985 GS1150ES stock with 85 Red E bodywork.

                        Comment


                          #13
                          yeah I didn't have a cut off wheel to cut them up and down so I just cut them down to the base of the insulator that is exposed to the combustion. I did accidentally scrape off some of the black at the bottom with the band saw blade. I was thinking they were too large based on that and have a set of 117.5's but I think I would rather wait for the 120's to come in and try them first. if I had more time I would have used the color tune on all four cylinders but I didn't even know if I had the fuel screws set right. if I had more time I would have also tried the 117.5 and did a plug chop on one of those. too darn busy lately!


                          for the idle and pilot jet, I think I am figuring it out. I am a little confused as to where the fuel screw should be set because it seems as if I could get a perfect blue flame with adjusting the air screw no matter where the fuel screw is set within reason. so it seems as if I need to tune it to where it feels the best and then use the colortune to set the air screw once I figure a perfect fuel screw setting. Correct? I'm guessing somewhere between 3/4 and 1-3/16 out on the fuel screws with a stock #15 pilot jet.

                          the tips from jets R Us seems to indicate that if I had excessive popping on deceleration that I needed to upsize my pilots. the popping on closed throttle/low throttle from deceleration from hard exceleration has subsided quite a bit compared to the previous settings before the rebuild but its still there
                          Last edited by Chuck78; 07-22-2013, 11:19 PM.
                          '77 GS750 920cc heavily modded
                          '97 Kawasaki KDX220R rugged terrain ripper!
                          '99 Kawasaki KDX220R​ rebuild in progress
                          '79 GS425stock
                          PROJECTS:
                          '77 Suzuki PE250 woods racer
                          '77 GS550 740cc major mods
                          '77 GS400 489cc racer build
                          '76 Rickman CR1000 GS1000/1100
                          '78 GS1000C/1100

                          Comment


                            #14
                            The pilot jet flows fuel. The larger the diameter, the more fuel it's capable of flowing. The pilot fuel mixture screw is what opens and closes the 'idle' fuel passage. A fully open pilot screw used with a #15 pilot will not flow as much fuel as a #17.5 will. A #17.5 pilot will not flow as much fuel as a #20 pilot will.


                            You get to decide which pilot jet will give the requisite amount of fuel necessary for proper operation. If you need to open the pilot screw (fuel screw) past say 4 turns (don't quote me on this) to get enough fuel for proper operation at idle and up to about 1/4 throttle, then you will need to up the pilot size to bring the mixture screw back down to a more reasonable adjustment range of 1 to 2 turns 'ish. You can only turn the pilot screw out so far before it fall out.

                            Got it?
                            De-stinking Penelope http://thegsresources.com/_forum/sho...d.php?t=179245

                            http://www.thegsresources.com/_forum...35#post1625535

                            Comment


                              #15
                              I'm getting it, but determining the correct pilot fuel screw setting is still a bit of a mystery. I hear 5/8 up to 2 turns out, adjust air screws then, but... what determining factor do I use to achieve the best fuel screw setting? Just the feel of it while riding and transitioning to the needle jet and needle range? Like I said, seems as if I could get perfect combustion at idle with the fuel screw in many different positions. The amount of fuel/power to transition up in the throttle range I think is what I am after. Also, what throttle opening amount (height of slides) dictated by the idle speed thumb screw on the cable linkage is appropriate to tune the carbs? I think it says start at two turns after contact if reading the VM carb rebuild tutorial guide on this site.
                              '77 GS750 920cc heavily modded
                              '97 Kawasaki KDX220R rugged terrain ripper!
                              '99 Kawasaki KDX220R​ rebuild in progress
                              '79 GS425stock
                              PROJECTS:
                              '77 Suzuki PE250 woods racer
                              '77 GS550 740cc major mods
                              '77 GS400 489cc racer build
                              '76 Rickman CR1000 GS1000/1100
                              '78 GS1000C/1100

                              Comment

                              Working...
                              X