Announcement

Collapse
No announcement yet.

Electronic Tach Circuit Design

Collapse
X
 
  • Filter
  • Time
  • Show
Clear All
new posts

    Electronic Tach Circuit Design

    Being one of the lucky ones with an electronic tach that no longer works, I wanted to remove it and see if it was as simple a fix as replacing some of the caps, like mentioned here and here. Unfortunately, after replacing everything but the black middle chip, it looks like I'm out of luck.

    However, Rustybronco mentioned here about using a LM2917 frequency to voltage converter and redesigning the board, and after some research decided to run with that.

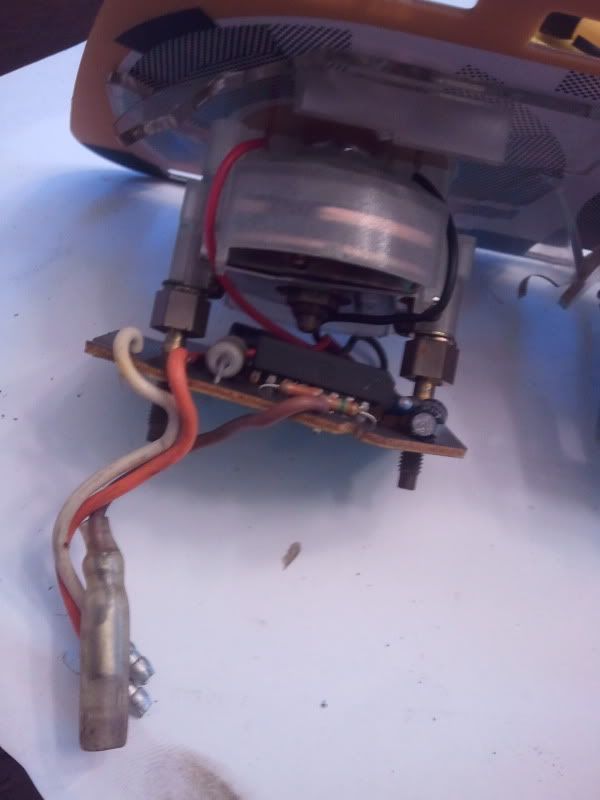
    First, I pulled the tach and got it on my bench. You can see the infamous black chip.


    Next, I fed the tach a few DC voltages and visually mapped out the deflection of the needle. Since this is done by eye, there is a small amount of error here but could be reduced with more points. You can see the data points I found (and one from one of the original posts) on the graph below:


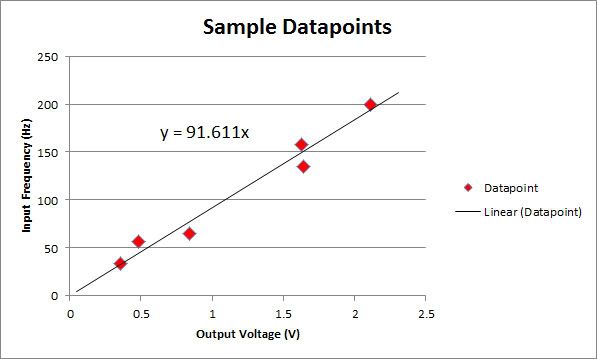
    The X-axis is voltage, and the Y-axis RPM / 60. The red dots are each sample point, and the black line is a linear regression model which is included in excel. Then we just take the slope of the line, and use that as the design parameters for the LM2917 circuit:


    I've added a zener voltage regulator to the input to protect the circuit and ensure the source is steady, since the output is a function of the input. Finally, wired everything up and gave it a square wave to mimic the signal off the coils...And it works! I took a bunch of sample points off the circuit and plotted them on the original graph:


    Honestly looks better/more linear than I expected, the response time to a changing input frequency is immediate, and the signal is steady. I've got pics of the circuit but it's just on a breadboard for now. I also hooked it up directly to the tach and it drove the needle without a problem.

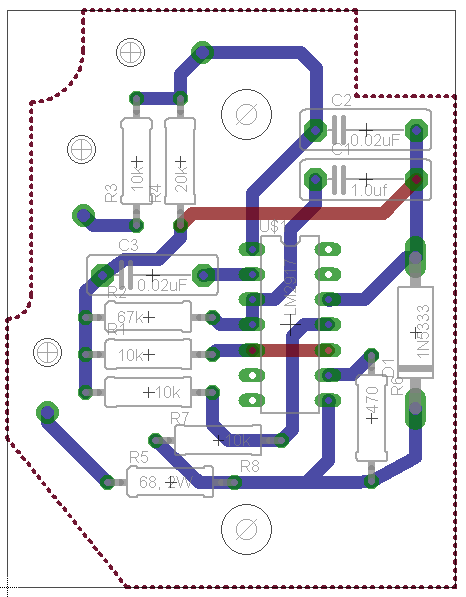
    Sparkfun has one-off PCBs, so the next step is getting the design in software and getting a board or two made that it will be a direct swap for the stock board...I'll update as I get there but wanted to show my progress so far

    #2
    Are the two resistors on the input ckt. for inductive spike?

    Comment


      #3
      Originally posted by four_shot View Post
      Are the two resistors on the input ckt. for inductive spike?
      The two resistors and cap were recommended in the datasheet. As I understand it, the input resistor limits the current, while the second resistor and cap are a low pass filter at 1/(2 pi R C). Since the resistors are in series, it also ends up limiting the input voltage by acting as a voltage divider...The smarter people here can probably correct me where I'm wrong

      Comment


        #4
        Nice work. I'm sure this woudl be a popular mod for the ES and 1150 guys

        Comment


          #5
          I'm sure glad you had time to run with it. I have the function gen, a scope but it just hadn't been high on the priority list for me.
          De-stinking Penelope http://thegsresources.com/_forum/sho...d.php?t=179245

          http://www.thegsresources.com/_forum...35#post1625535

          Comment


            #6
            Subscribed!!

            This would be an awesome mod for anybody who has a non-funcional electronic tach. I don't know if mine works yet or not. But if it does or if it doesn't it'd still be nice to know down the road I could fix it.
            1981 GS750L (sold)
            1981 GS750L (current)
            1978 Yamaha RD400 (RD = Race Development)
            1981 Honda CT70 (86+ MPG at WOT most of the time)
            1983 GS1100GL (needs work: update, gone to a new home)
            1956 Simplex (with a TS250 motor)
            1985 GS1150E (Hammer Time!!)
            1998 1200 Bandit (Rattler)
            1980 GS1100L (Janice)
            Do I continue?

            "An unarmed man can only flee from evil, and evil is not overcome by fleeing from it." - Col Jeff Cooper
            e tan, e epi tan

            Comment


              #7
              Hi,

              I just wanted to thank you for your terrific work. It looks good, like something a hobbyist could put together. It shouldn't be to difficult for us mere mortals. Thanks for sharing. This will come in very handy for a lot of people.


              Thank you for your indulgence,

              BassCliff

              Comment


                #8
                Thanks all, glad to hear this could be something of use. As soon as i get it in the Gerber/pcb format I'll post the files for download. If I end up using Sparkfun's service it's a $10 charge plus $2.50 per square inch...the original board is around 2" x 2", so for $20 I can do one or $30 I could do a run of a couple to test everything out.

                Comment


                  #9
                  Looks like a good setup.. those damn things are always temperamental after 30+ yeards it seems.
                  1980 GS1000G - Sold
                  1978 GS1000E - Finished!
                  1980 GS550E - Fixed & given to a friend
                  1983 GS750ES Special - Sold
                  2009 KLR 650 - Sold - gone to TX!
                  1982 GS1100G - Rebuilt and finished. - Sold
                  2009 TE610 - Dual Sporting around dreaming of Dakar..... - FOR SALE!

                  www.parasiticsanalytics.com

                  TWINPOT BRAKE UPGRADE LINKY: http://www.thegsresources.com/_forum...e-on-78-Skunk/

                  Comment


                    #10
                    oooh oooh i want in on this. are you going to have a couple made to dole out to those of us with more money than time? i would be in on one fo' sho. will be watching this thread, thanks for the hard work on this!!!!

                    greg
                    1983 GS 1100 ESD :D

                    Comment


                      #11
                      A quick update!!

                      The pcb design is below. It's measured out so it should be a direct swap for the current board (about 45mm x 58mm).


                      You can probably read most of the component values from the board, but there are a couple inconsistencies from the actual parts so I listed them below:

                      2 x 0.02 uF Capacitors
                      1 x 1.0 uF Capacitor
                      1 x 470 Ohm Resistor
                      1 x 20k Ohm Resistor
                      4 x 10k Ohm Resistor
                      1 x 67k Ohm Resistor
                      1 x 68 Ohm, 2 Watt Resistor
                      1 x 8.2 Volt, 3 Watt Zener Diode
                      1 x LM2917

                      I'll have the Gerber files posted in the next update in case anyone wants to make their own, but I'm also doing a run of a couple boards to test everything out. Greg78gs750 kindly offered to be the first test subject, so as soon as we get the boards back and soldered up we'll be able to post some results.

                      Comment


                        #12
                        Tacho board

                        Has there been any movment on this yet? Have the new boards come in yet? Thanks for all the effort!!!
                        1981 GS750L (sold)
                        1981 GS750L (current)
                        1978 Yamaha RD400 (RD = Race Development)
                        1981 Honda CT70 (86+ MPG at WOT most of the time)
                        1983 GS1100GL (needs work: update, gone to a new home)
                        1956 Simplex (with a TS250 motor)
                        1985 GS1150E (Hammer Time!!)
                        1998 1200 Bandit (Rattler)
                        1980 GS1100L (Janice)
                        Do I continue?

                        "An unarmed man can only flee from evil, and evil is not overcome by fleeing from it." - Col Jeff Cooper
                        e tan, e epi tan

                        Comment


                          #13
                          hey tazman, nater is working on it, i think he's been busy. let you know if i hear anything.
                          1983 GS 1100 ESD :D

                          Comment


                            #14
                            Sorry guys, my wife and I just had our first kid on Valentines Day (a little girl) so things have been a little crazy since then! I've got the board design completed and on order, and already have all the components in to solder everything up. The board house says 3 more weeks until I get the demo boards (cheaper price, long lead times), but once they're in and soldered up we'll start testing.

                            Comment


                              #15
                              Congrats! Have fun with the young one while you can. Sooner than you think, she'll be asking you for a car for her birthday.....lol

                              Comment

                              Working...
                              X