Announcement

Collapse
No announcement yet.

getting started, sorta

Collapse
X
 
  • Filter
  • Time
  • Show
Clear All
new posts

    getting started, sorta

    I got this bike about 3 years ago, and promptly signed up on this forum. Aaaaand... didn't do much. So little, in fact, that the account lapsed. For a number of reasons, it's time to get serious.

    First info so people have a starting point. 1981 GS850G with a bit over 5000 miles. It's not been run in AT LEAST ten years. For all that, a lot of it looks not bad to my inexperienced eyes. Inexperienced... my ignorance is vast, though I'm willing to learn. Oh - I also picked up a copy of the service manual. Well, a service manual. It's a reprint of the one for the "n". That's got me caught right now - I'll get there in a moment.

    Over the past three years I've done some small things. Plugs, coils, and the wires/boots between are new. I've cleaned corrosion and replaced a few wires and checked (and replaced a few) fuses.

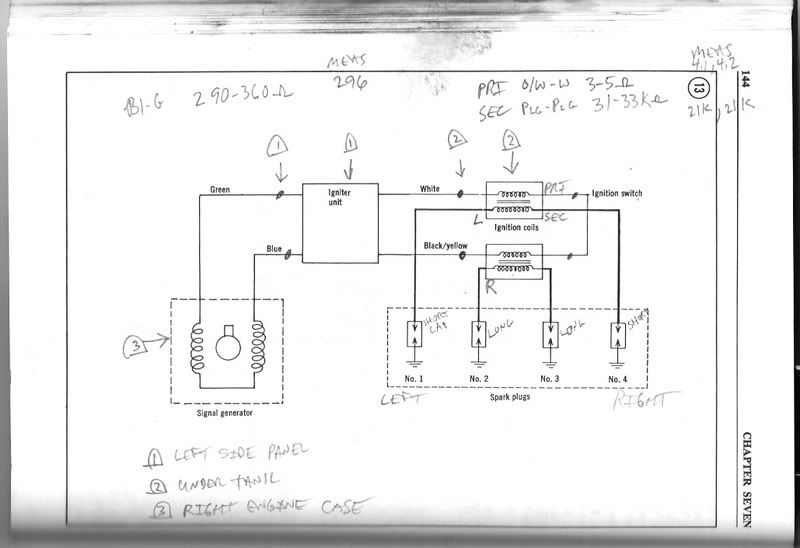
    Because of this work, the lights work. With the clutch pulled, the starter will spin the motor. But my next big trick is getting a spark. I've read several posts here, and find I can't figure out what they're saying. Specifically, the instructions for testing the ignitor don't make sense to me as I can't find a front and back pin. That either means I'm not looking at the right thing, or something is off.

    I took a picture of what I think is the ignitor. It's properly located just to the left of the fusebox and below the solenoid. I've removed the black tin cover. Note I just discovered I can only load one picture at a time (I dunno why, I'll figure it out) but have more pictures - and can take more as I go. If this is the right thing, where are these pins (or do I need to flip it over and show the picture of THAT side?) For reference it's not resin filled. So I can, if needed, read most of the labels of the resistors and caps and so forth.

    Oh, I've got lots more to discuss, but let's keep that simple for now.

    If this is the ignitor, where are the pins I need to test?

    #2
    Can you post a pic of the other side? That looks more like a R/R than the electronic ignition, but its hard to tell from the solder side. . .

    Comment


      #3
      I agree, based on where you found it. Tho some of the 850s had the RR mounted UNDER the bat box. Ive seen a couple of 850s with the ignitor mounted on the RIGHT side of the bat box, but i dont know them all. Show us the cover!

      Comment


        #4
        I would have to say that from that picture I couldn't say what it was, other than it looks broken.

        Where's the wires coming out of it????

        Suzuki mad

        Comment


          #5


          KS,
          Welcome back.
          Your picure posted above in a different manner for everyone to see.

          I would say that is not the regulator/rectifyer (those are all potted, and thick alunimum heat sink case). And the shape and your description of "tin metal cover" does sound more like the ignitor. ALthough I have never pried off the cover to see what you are showing in the picture.

          WHich manual do you have? Or maybe I should ask, what manual do you have a copy of?

          This picture from a Clymers manaul is a good generic schematic, usefull for understanding the entire system. (the hand scribble notes would be realtive to the 80 850g that I had). Doesnt help you find anything on the bike, but good for understanding the the entire system. One thing that is not so well shown is where the power comes from, that is just ther in upper right where it says "ignition switch", that is where the power comes in from the ignition switch.


          Any further troubleshooting will require use of a meter. Other option would be the expencive methos of just buying parts and replacing parts.

          First thing to check would be the power to the ignition coils.

          Tell us more of what you find.

          Oh, to answer your question of "what pins". I dont specifically know, but I dont think the Clymer or the Hayes or the Suzuki factory manaul would have you testing points on the circuit board. They most likley would be refereing to the pins on the connector on the end of the wiring harness.
          So, rather than trying to find the device itself, what you really need to find is the connector in the wiring harness.
          Last edited by Redman; 06-29-2008, 08:23 AM.
          http://webpages.charter.net/ddvrnr/GS850_1100_Emblems.jpg
          Had 850G for 14 years. Now have GK since 2005.
          GK at IndyMotoGP Suzuki Display... ... GK on GSResources Page ... ... Euro Trash Ego Machine .. ..3 mo'cykls.... update 2 mocykl


          https://imgur.com/YTMtgq4

          Comment


            #6
            Thanks, all. First, I was going to upload a bunch of photos - and I see others manage - but the system only let me do one. You're right, bad poster, shame on me. other side of the circuit board attached here.

            Second, it's the Suzuki Motor Company (english version) service manual. "Prepared by Suzuki motor Co., LTD. Service Department, Overseas Marketing Division, January 1979. Manual No. SR-8200 [kanji I don't know] E-3. Printed in Japan."

            Comment


              #7
              Third photo - box, with cover, in place.

              For reference the wires from the signal generator go to this box.

              Comment


                #8
                That is an igniter.
                1983 GS 1100E w/ 1230 kit, .340 lift Web Cams, Ape heavy duty valve springs, 83 1100 head with 1.5mm oversized SS intake valves, 1150 crank, Vance and Hines 1150 SuperHub, Star Racing high volume oil pump gears, 36mm carebs Dynojet stage 3 jet kit, Posplayr's SSPB, Progressive rear shocks and fork springs, Dyna 2000, Dynatek green coils and Vance & Hines 4-1 exhaust.
                1985 GS1150ES stock with 85 Red E bodywork.

                Comment


                  #9
                  digression

                  Since I asked in this thread, I'll answer in this thread. Could the Folk In Charge make an FAQ link to BikeCliff's "Posting Pictures in GS" article? Please? Because posting one at a time sucks for everyone.

                  And that said, here are the other two I'd left off of my work in progress. The bike, fuel tank removed as I work on something; and the signal generator - the something upon which I was working.


                  and


                  Kirk

                  Comment


                    #10
                    Originally posted by kspencer View Post
                    I've read several posts here, and find I can't figure out what they're saying. Specifically, the instructions for testing the ignitor don't make sense to me as I can't find a front and back pin.

                    If this is the ignitor, where are the pins I need to test?
                    I have an 80 gs850g manual at home and as soon as I can, I will help you make heads or tails of testing it.
                    It might be late tonight or even tomorrow.
                    Last edited by rustybronco; 06-30-2008, 03:21 PM.
                    De-stinking Penelope http://thegsresources.com/_forum/sho...d.php?t=179245

                    http://www.thegsresources.com/_forum...35#post1625535

                    Comment


                      #11
                      Hee Haw Howdy!

                      Welcome back Mr. kspencer,

                      There is a link to my site in the Garage Section, but not to any specific articles. Here's lots of 850G lovin' in your own mega-welcome!

                      Dear fellow GS rider,


                      Let it be known that on this day you are cordially and formally welcomed to the GSR Forum as a Junior Member in good standing with all the rights and privileges thereof. Further let it be known that your good standing can be improved with pictures (not you, your bike)!

                      Perhaps you've already seen these, but I like to remind all the new members. In addition to the
                      carb rebuild series, I recommend visiting the In The Garage section via the GSR Homepage and check out the Stator Papers. There's also a lot of great information in the Old Q&A section. I have some documentation on my little BikeCliff website to help get you familiar with doing routine maintenance tasks (note that it is 850G-specific but many tasks are common to all GS bikes). Other "user contributed" informational sites include those of Mr. bwringer, Mr. tfb and Mr. robertbarr. And if your bike uses shims for valve adjustments, send an email to Mr. Steve requesting a copy of his Excel spreadsheet that helps you keep track of clearances, shim sizes and other service work.

                      These are some edited quotes from one of our dear beloved gurus,
                      Mr. bwringer, with ideas on basic needs (depending on initial condition), parts, and accessories.
                      ***********Quoted from Mr. bwringer************

                      Every GS850 (and most other models) has (or had) a set of well-known issues that MUST be addressed before you have a solid baseline for further troubleshooting. It's a vintage bike, and it's quite common (as in, every single GS850 I have had contact with) that there are multiple problems that have crept up and slowly gotten worse over the years. It's not like a newer vehicle, where there's generally one problem at a time.

                      These common issues are:

                      1. Intake O-rings (install NEW OEM or Viton only - common nitrile O-rings will quickly deteriorate from heat)
                      2. Intake Boots (install NEW -- these cannot be repaired)
                      3. Valve clearances (more important than most people think)
                      4. Carb/airbox boots
                      5. Airbox sealing
                      6. Air filter sealing
                      7. Petcock (install a NEW one)
                      8. On '79 models, install new points or Dyna electronic ignition (or at least verify that the old points are working correctly)
                      9. On all models, it's fairly common to have problems with the spark plug caps. These are $3 or $4 each, and often worth replacing if you're keeping the stock coils/wires.
                      10. Stock exhaust with NO leaks or holes -- good seals at the head and at the junctions underneath.
                      ***********************************
                      Carburetor maintenance:

                      Replace the intake boot o-rings, and possibly the intake boots. Here's the procedure:

                      Here's an overview of what happens with this particular problem:

                      You'll also want to examine the boots between the carbs and the airbox. There's a good chance these are OK, but check them over.
                      And finally, if things still aren't exactly right, you'll want to order a set of o-rings for BS carbs from the GS owner's best friend, Robert Barr:
                      http://cycleorings.com
                      Once you receive these rare rings of delight, then you'll want to thoroughly clean and rebuild your carburetors. Here are step-by-step instructions that make this simple:


                      ***************************************
                      OEM Parts/Online Fiches:

                      I would definitely double and triple the recommendations to use Cycle Recycle II and Z1 Enterprises as much as possible. These guys are priceless resources. Z1 tends to have slightly better prices, CRC2 has a wider range of goodies available. If you're near Indy and can bring in an old part to match, CRC2 has a vast inventory of used parts.
                      http://denniskirk.com - Put in your bike model and see what they have.
                      http://oldbikebarn.com - seems to be slowly regaining a decent reputation, but it's still caveat emptor. They don't have anything you can't get elsewhere at a better price anyway.
                      http://www.babbittsonline.com/ - Decent parts prices. Spendy shipping. Don't give you part numbers at all. Useful cross-reference if you obtain a part number elsewhere. Efficient service.
                      http://bikebandit.com - Fastest. Middlin' prices. Uses their own parts numbering system to obfuscate price comparisons -- can be very confusing for large orders. Cheapest shipping, so total cost usually isn't too bad.
                      http://flatoutmotorcycles.com - Slow. Cheapest parts prices, crazy shipping costs. Don't expect progress updates or much communication. Real Suzuki part numbers.
                      http://alpha-sports.com - Exorbitant parts prices. Different type of fiche interface that's quite useful at times, especially with superceded part numbers. Real parts numbers. Shipping cost and speed unknown due to insane, unholy pricing.

                      Stainless Bolts, Viton o-rings, metric taps, dies, assorted hard-to-find supplies and materials, etc:

                      http://mcmaster.com - Fast, cheap shipping, good prices. No order minimum, but many items like bolts come in packs of 25 or 50. Excellent resource.
                      http://motorcycleseatcovers.com - Great quality, perfect fit (on original seat foam), and available for pretty much every bike ever made. Avoid the textured vinyl -- it's perforated.
                      http://newenough.com - You DO have riding gear, don't you? Great clearances, always outstanding prices and impeccable service.
                      ***************End Quote**********************
                      Additional parts/info links:

                      GSR Forum member Mr. duaneage has great used upgraded Honda regulator/rectifiers for our bikes. Send him a PM.
                      New electrical parts:
                      http://stores.ebay.com/RMSTATOR or http://www.rmstator.com/
                      Aftermarket Motorsport Electrics parts for motorcycles, dirtbikes, atvs, motosport vehicles manufactured and distributed by Rick's Motorsport Electrics


                      For valve cover and breather cover gaskets, I recommend Real Gaskets (reusable silicon):
                      Real Gaskets Tennessee is a manufacturer of silicone rubber valve cover gaskets for aircraft engines, automobile engines, and motorcycle engines.

                      The Rice Paddy (salvage/used)

                      Carolina Cycle
                      Discount OEM Motorcycle & ATV Parts. Warehouse Direct. Since 1970.

                      Ron Ayers Motorsports
                      Honda Suzuki Kawasaki Yamaha OEM motorcycle atv and side by side parts with a full line of aftermarket accessories.

                      MR Cycles
                      Find OEM motorcycle and ATV parts for Honda, Kawasaki, Suzuki, Yamaha, and Polaris.

                      Moto Grid

                      If all else fails, try this:
                      Discover the world of motorcycle restoration and repair at Used Motorcycle Parts Org. Our blog provides invaluable insights into finding and utilizing used motorcycle parts, DIY repair guides, and tips for restoring vintage bikes. Whether you're a seasoned mechanic or a hobbyist, we're your trusted resource for all things related to motorcycle parts and maintenance.

                      Used bike buying checklists:


                      Lots of good info/pictures here:
                      Probably the largest Suzuki motorcycle fan site in the world. Online since 2001. Thousands of pages with technical information, pictures, magazine adverts and brochure scans of most Suzuki motorbikes ever sold in different parts of the world. Thousands of bike pictures and stories posted by the readers. ALL Suzuki motorcycle models around the world have their place here!


                      http://www.bikepics.com

                      Basic motorcycle maintenance/repair:
                      http://www.dansmc.com/mc_repaircourse.htm
                      Online Clymer manuals:
                      http://search.ebscohost.com/ Click on "Small Engine Repair" then "Motorcycles". User=library, password=library. Note: This link may not work if you are on a school campus.


                      Thanks for joining us. Keep us informed of your progress. There's lots of good folk with good experience here.

                      Thank you for your indulgence,

                      BassCliff
                      (The unofficial GSR greeter)

                      Comment


                        #12
                        Originally posted by kspencer View Post
                        Since I asked in this thread, I'll answer in this thread. Could the Folk In Charge make an FAQ link to BikeCliff's "Posting Pictures in GS" article? Please? Because posting one at a time sucks for everyone.
                        I'd imagine getting saddled with paying to host a ton of images on a free to use site would suck worse.

                        Host the images on your own webspace, or through one of the many free hosting sites like photobucket, and embed the images using the "[img]yourlinkhere[/img]" tags. There's still a 5 image (including smiley's) but it is very much workable.

                        Comment


                          #13
                          ShauGhn, yep, I agree. Which is what I finally figured out - after the single-loads.

                          Kirk

                          Comment


                            #14
                            Oh, heh. Missed that. Good!

                            Comment


                              #15
                              Testing The Igniter And Signal Generator

                              IGNITION KEY OFF!!!!!
                              At the igniter under the left hand side cover there should be two connectors, one has two wires (signal generator connector) the other has four wires. disconnect only the connector with the the two wires (blue and green wires) and on the HARNESS side (not the igniter side) of the connector, measure the resistance between the blue and green wires, it should be between 250 and 360 ohms. if it shows open (infinity) or less than 250 ohms the signal generator is bad and must be replaced
                              ***note*** don't forget if it shows open you could have a bad wire or a bad connector to the signal generator under the signal generator cover (the one with the suzuki decal on the right side, not the that says gs850g)

                              IGNITION KEY STILL OFF!!! (and still leaving the two wire connector disconnected)
                              remove the number 1 and 2 spark plugs, fit them into their respective plug wires and place them on the cylinder head. (outer shell grounded on the head)

                              TURN THE IGNITION KEY ON!
                              and set the range of your volt ohm meter (vom) to the 1x scale or if you don't have a 1x scale, you should be able to use the diode test position with most dvoms (digital..).

                              ***read this next part first, then do it***
                              connect the +(positive or red) lead of the vom to the blue wire on the IGNITER side connector and the -(negative or black) lead to the green wire of the IGNITER.
                              when you connect the -(negative) lead to the green wire the #1 plug should fire (spark), when you remove the -(negative) lead of the vom from the green wire the #2 plug should fire.... got it?, o.k. then do it.

                              ***note***This test is valid only if the coils and wires are good."
                              De-stinking Penelope http://thegsresources.com/_forum/sho...d.php?t=179245

                              http://www.thegsresources.com/_forum...35#post1625535

                              Comment

                              Working...
                              X