They're a little dusty from sitting around now for a week - looking forward to getting them out in the wind soon
Announcement
Collapse
No announcement yet.
Magnusen's GS1000 rebuild
Collapse
X
-
smagnusen
Step 2 is painting. The frame is in fair shape, so I'm planning on doing the tank, fender, seat moulding, tail piece, fairing, and even though I'm not putting them on, the side panels.
Having never done any of this before, I didn't really want to deal with my decrepid tank. I bought one from Ebay that was supposed to be in better shape. It wasn't. Actually, it wasn't even the right tank.
After a hard look at the dents, rust, and shoddy lead and braze repairs coving my tank, I set in.
I first ground out the spot-welds on the bands that hold the badges. (I'm filling those in) This was easier said than done. I first found that I wasn't grinding the correct area. There were three welds on each band. I ground too deeply on the first one and made my way into the tank. I had much better luck on the remaining 5 welds by switching my approach. The key was to grind down through the weld closely to the bottom of the band, but not all the way to where the metals meet, then bend and twist the metal band with a pliers until it pops cleanly from the tank. They're not fun to get off but I'm glad I did because the area was filled with rust.
Sanding revealed the tank was practically covered in body filler. This pic shows the top coat on the left moving into primer and then the tan body filler.
I actually took a belt sander to it and got about 90% of it off before hitting it with aircraft stripper.
I got most of the remains off in a big mess with steel brushes. The bottom was covered in a film of creaping rust, and there were a few holes that revealed themselves.
To get rid of the remaining crud and rust I hit it with my HF sand-blaster. I have a larger sand-blaster, but honestly the H.F. hobby blaster works remarkably well. I used it to soda blast my carb bodies as well. Here's the tank getting blasted-
Comment
-
smagnusen
This is the nice clean bottom after a quarter bag of sand
Here are a couple of the holes
And here they are mig welded [as you can see, I'm a professional welder. uhm, no.]
Comment
-
smagnusen
Having never done any of this I expected to fully suck at it. It would have been nice to get some hands-on guidance from someone who knows what they're doing, but at least I was free to completely screw-up away from anyone who knows what they're doing.
There was a reason why the tank was covered in body filler. It needed it. After throwing a bit of filler on here and there, it was clear I wasn't going to get any smooth clean lines.
To cheat, I dug out this tool I bought from a garage sale years ago not knowing what is was or what i would ever use it for.
It's called a calibrated adjustable curve. It bends gracefully and holds it's shape, it also strangely smells absolutely aweful - no joke, like a rotting possum - best not to smell it. Anyways it turned out to be a great tool for finding the highs and lows, along any sweeping curve.
The other tool I used was home-made. To keep the natural curves of the tank while sanding I made my own sanding block. Why? Mostly because I was too ignorant to know much better ones existed or where to get one. That said, I loved this tool. Fashioned from a 3 x 24 inch piece of plexiglass, backed with thick hardware-store felt, and covered with a cut-open length of sanding belt, this had a good balance of flexibility vs. rididity to quickly follow and sand the curves of the tank.
Here's the tank ready for primer. Looks ugly I know, but if I close my eyes and run my hand across it, I cannot make out a single imperfection.
Last edited by Guest; 06-19-2009, 04:35 PM.
Comment
-
smagnusen
And here's a couple pics of the other pieces-
I ground and sanded down the lens area on the tail piece because I'm filling it in. I'll mount some reflectors below the tail but I don't want those areas in the way of the paint scheme. I'm going to fill behind the lens area and reinforce the whole piece (becuase it's inherently flimsy) with fiberglass.
The fairing, by the way, is from 'The Dude' Some of you know him. It's the first from a new mould and it is
very
well
done.
Can't wait to screw it up.
Comment
-
Forum LongTimerGSResource Superstar
Past Site Supporter
Super Site Supporter- Mar 2006
- 35629
- Torrance, CA
You might want to get yourself one of those 1/3 sheet rubber blocks to assist in your sanding work. I think you’d find it much easier to use than that plexiglass. Also, get yourself some really coarse sandpaper, in the range of 60 grit. It really helps you level down the body filler and get a flat surface.
You’re doing great work. Keep going!Ed
To measure is to know.
Mikuni O-ring Kits For Sale...https://www.thegsresources.com/_foru...ts#post1703182
Top Newbie Mistakes thread...http://www.thegsresources.com/_forum...d.php?t=171846
Carb rebuild tutorial...https://gsarchive.bwringer.com/mtsac...d_Tutorial.pdf
KZ750E Rebuild Thread...http://www.thegsresources.com/_forum...0-Resurrection
Comment
-
smagnusen
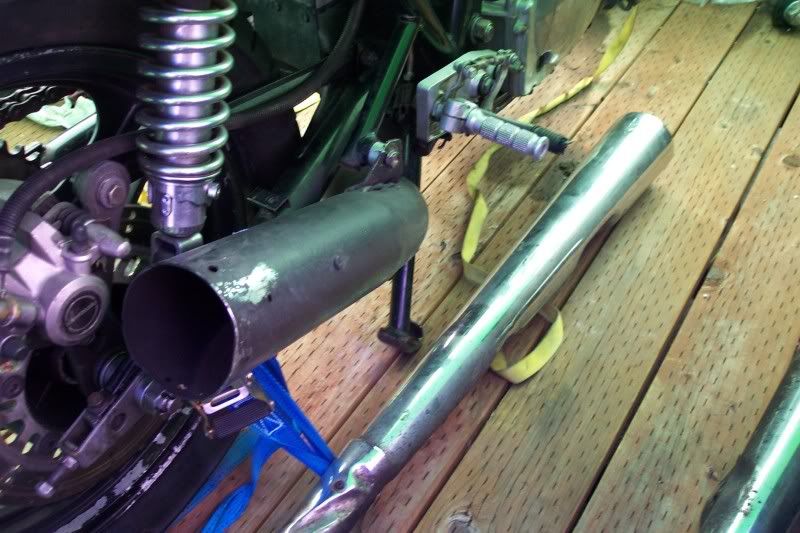
I'm looking for advice today on whether or not I should buy this exhaust. It's claimed to be an authentic yosh pipe. It's old, a little banged up, looks like it might have been painted over some rust?
I don't want it if I can't get it looking sharp, does it look like a good ceramic coating could hide the blemishes?
Thanks.
Comment
-
smagnusen
-
reddirtrider
The ceramic coating won't hide blemishes - if you mean small dents. You'll need to have the pipe sand blasted prior to coating to remove the rust. Be careful of the media grit as a real aggressive media may distort the pipe depending on the wall thickness.
Yea, that looks like a Yoshi cannister. You could fit another can to it if you don't like the look of it.
Make sure the flanges are correct or you'll be needing to fit new ones as those look to be the small ones. The down tube spacing shouldn't be an issue, but check it to make sure.
Comment
-
The pipe is probably Yosh, but it's not period.
4-1 headers, back in the day, did not have cans on the end.
They were a header and a megaphone.
Last edited by Big T; 06-22-2009, 05:46 PM.1978 GS 1000 (since new)
1979 GS 1000 (The Fridge, superbike replica project)
1978 GS 1000 (parts)
1981 GS 850 (anyone want a project?)
1981 GPZ 550 (backroad screamer)
1970 450 Mk IIID (THUMP!)
2007 DRz 400S
1999 ATK 490ES
1994 DR 350SES
Comment
-
I'm also interested as to when the "cans" came around. I baught a new Yosh in "83" & don't remember a "can" being so different, but they sure have a sound like nothing else. Too old now, can't do without the centerstand & can't deal with removing the pipe to change the oil.1983 GS1100E, 1983 CB1100F, 1991 GSX1100G, 1996 Kaw. ZL600 Eliminator, 1999 Bandit 1200S, 2005 Bandit 1200S, 2000 Kaw. ZRX 1100
Comment
-
the stuff with the cans i think came out around the 80's the megaphone was the late 70's stuff, BTW the 70's megaphone is a lot heavier then the can pipes and the megaphone has a 3.5" colllector pipe vs the 2.5" collector pipe of the can. I have both, the can pipe i have is in a lot nicer shape and i think was ment for the 1100's really. The megaphone was more for the 1000's. Before i started my motor rebuild the can pipe sound real good on my 1000, I can only imagine what the megaphone will sound like being 1.5"s bigger. i have an old yosh catalog sheet let me see if i can did it out.Last edited by first timer; 06-23-2009, 04:06 PM.78 GS1000 Yosh replica racer project
82 Kat 1000 Project
05 CRF450x
10 990 ADV-R The big dirt bike
P.S I don't check PM to often, email me if you need me.
Comment
-
Mine was a racebike and lacked a silencer.
The sound was unbelievable!
I fabbed up a silencer for it (thanks Duanedge!) and my neighbors will speak to me know.1978 GS 1000 (since new)
1979 GS 1000 (The Fridge, superbike replica project)
1978 GS 1000 (parts)
1981 GS 850 (anyone want a project?)
1981 GPZ 550 (backroad screamer)
1970 450 Mk IIID (THUMP!)
2007 DRz 400S
1999 ATK 490ES
1994 DR 350SES
Comment
Comment