Announcement

Collapse
No announcement yet.

Project Windjammer

Collapse
X
 
  • Filter
  • Time
  • Show
Clear All
new posts

    #31
    Vetter

    Interesting, I thought the fairings were fiberglass. As I had a very old one on a KZ650 I gave to my friend with a KZ1000. It had cracked in the back from the pocket openings on top to the bottom of the pockets. I got some seriousglassing done then. When did they go to the plastic?
    Tanx
    G
    sigpic1983 1100 Katana - soon to be turbo Busa powered.
    2007 GSXR1K-Sold-But not forgotten.
    Have 2X ZG14 engine's for '81 GS750E project.
    '82 GS750E frame is TITLED awaiting GSXR1127/12B engine and '81 1100E slowly being built.:eek:

    Comment


      #32
      Originally posted by gmansyz View Post
      Interesting, I thought the fairings were fiberglass. As I had a very old one on a KZ650 I gave to my friend with a KZ1000. It had cracked in the back from the pocket openings on top to the bottom of the pockets. I got some seriousglassing done then. When did they go to the plastic?
      Tanx
      G
      As far as I know the very first fairings Craig Vetter built in the mid 70's may have been fiberglass, thereafter they were all ABS plastic.

      Comment


        #33
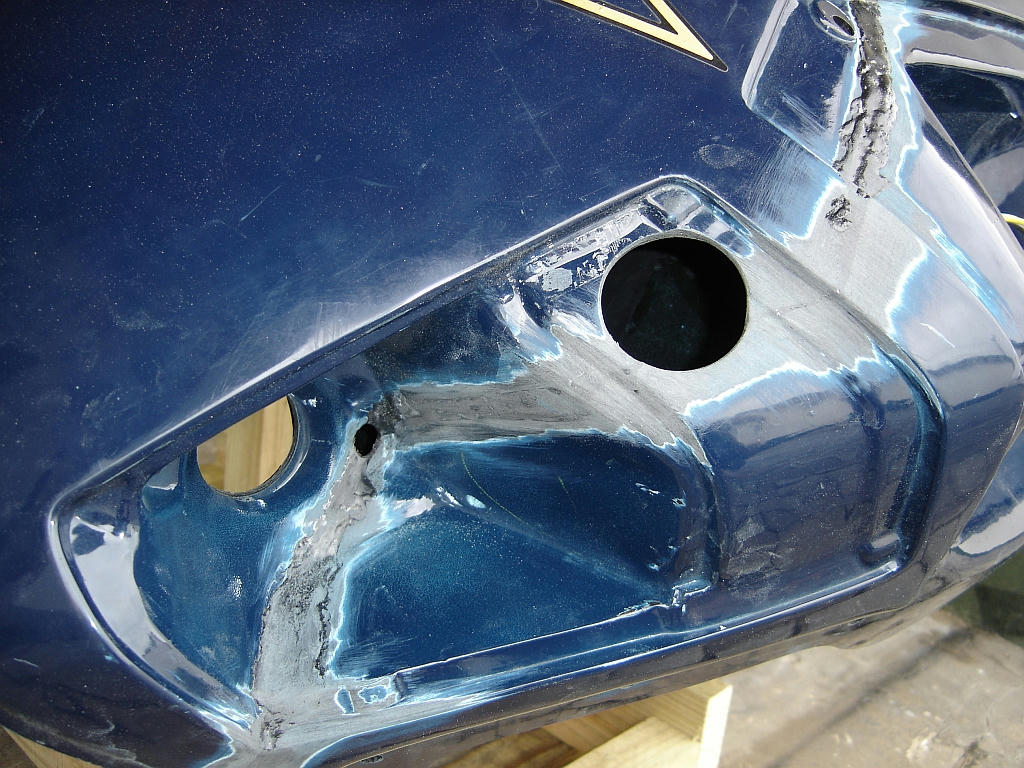
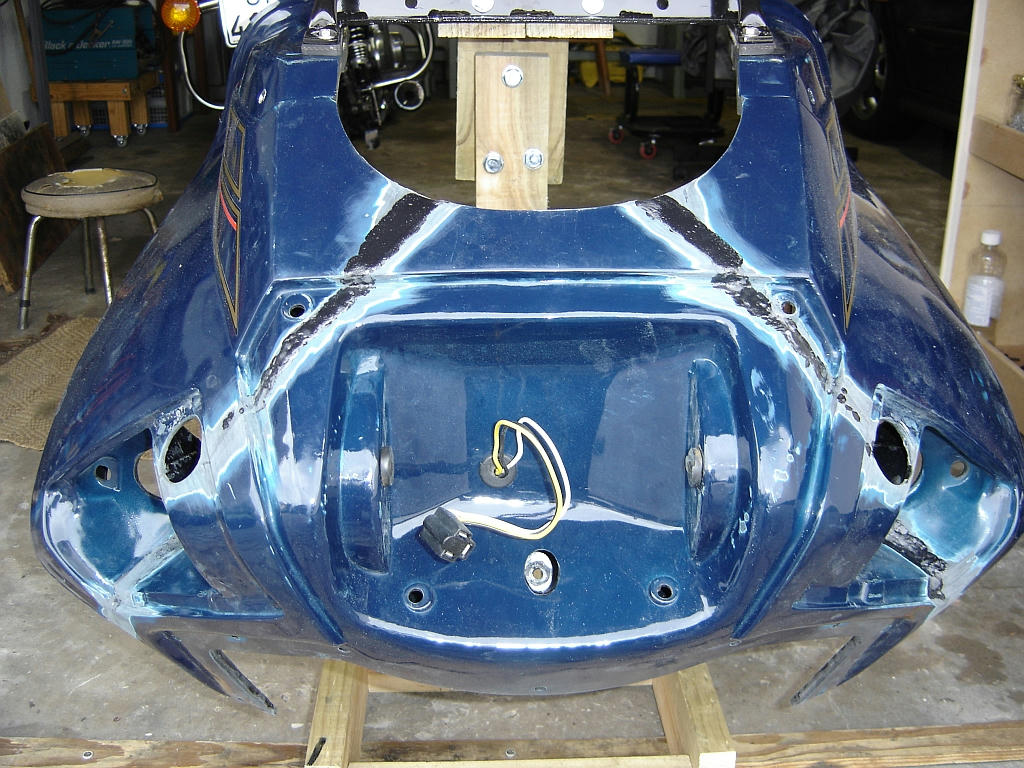
        Some more progress today. The parts are joined together, lapped and bridged on the inside with ABS strips and beads of slurry over the cuts.
        I have started sanding the join and adding more layers of slurry where required to fill the cuts:


        Comment


          #34
          That is really outstanding! Hypothetically, if the acetone slurry truly melds everything together, there shouldn't even be a seam left when you've sanded smooth... What a fantastic way to have gotten around the prohibitive cost of shipping that monster!

          Regards,

          Comment


            #35
            By the way, on a side note ... In that last picture I was reminded (from looking at the headlight plug) that if you want to fit an "H4" bulb (preferably Silverstar because they are AWESOME!) to the Vetter fairing you will need to chop that original plug off and replace it with a shorter alternative. The Vetters used a very deep OEM plug, but most auto parts stores sell a much shorter "standard" replacement plug that will allow for the better bulbs and deeper housings required to use them.

            I mention this because the H4 conversion from a standard sealed beam is one of the best safety upgrades you can make to the Vetter (and any bike that doesn't already use the H4's)...

            ...and now, back to our regularly scheduled resurrection!!!

            Regards,
            Last edited by Guest; 12-17-2010, 01:25 PM. Reason: fixed a typo

            Comment


              #36
              Originally posted by Planecrazy View Post
              That is really outstanding! Hypothetically, if the acetone slurry truly melds everything together, there shouldn't even be a seam left when you've sanded smooth... What a fantastic way to have gotten around the prohibitive cost of shipping that monster!
              It sands quite well and yes there should be no seam as you can see. Its just a bit of a slep having to wait a day or two for the slurry to dry before sanding.

              By the way, on a side note ... In that last picture I was reminded (from looking at the headlight plug) that if you want to fit an "H4" bulb (preferably Silverstar because they are AWESOME!) to the Vetter fairing you will need to chop that original plug off and replace it with a shorter alternative. The Vetters used a very deep OEM plug, but most auto parts stores sell a much shorter "standard" replacement plug that will allow for the better bulbs and deeper housings required to use them.
              I am planning to use my bikes OEM headlight which already has a H4 Silverstar in it. I have not tried to fit it with the Windjammer V type headlight shroud. Hope it will fit though! I will check that out, thanks.
              I must actually remove that cable for the painting and will pop the spade connectors from the H4 plug anyway.

              Comment


                #37
                Originally posted by Matchless View Post
                I am planning to use my bikes OEM headlight which already has a H4 Silverstar in it. I have not tried to fit it with the Windjammer V type headlight shroud. Hope it will fit though! I will check that out, thanks.
                I must actually remove that cable for the painting and will pop the spade connectors from the H4 plug anyway.
                With all that ABS you could probably mold your own H4 Plug around the spade connectors, hehe! The other possibility is that once you remove the connectors from the OEM plug you might simply be able to cut/grind off the back so that it becomes the shorter plug you're most likely going to need. Either way, at least you now know to watch for the clearance problem...

                Regards,

                Comment


                  #38
                  Originally posted by Planecrazy View Post
                  With all that ABS you could probably mold your own H4 Plug around the spade connectors, hehe! The other possibility is that once you remove the connectors from the OEM plug you might simply be able to cut/grind off the back so that it becomes the shorter plug you're most likely going to need. Either way, at least you now know to watch for the clearance problem...

                  Regards,
                  Steve,
                  I just came back from pulling that plug, the grommet was hard and brittle, so I need to get another one. I have a H4 socket which is more of a side entry for the wires and is much shorter that the one I just pulled out. I can even see the mark where the wires were pushed against the back.
                  Thanks for the tip!

                  I am leaving a raised bead of ABS over the cut under the flashers and headlight shroud and only smoothing off the short visible bits. That slurry fuses very well with the base plastic.

                  Comment


                    #39
                    Way cool! Now it is starting to look more familiar! What color is it gonna be ?
                    MY BIKES..1977 GS 750 B, 1978 GS 1000 C (X2)
                    1978 GS 1000 E, 1979 GS 1000 S, 1973 Yamaha TX 750, 1977 Kawasaki KZ 650B1, 1975 Honda GL1000 Goldwing, 1983 CB 650SC Nighthawk, 1972 Honda CB 350K4, 74 Honda CB550

                    NEVER SNEAK UP ON A SLEEPING DOG..NOT EVEN YOUR OWN.


                    I would rather trust my bike to a "QUACK" that KNOWS how to fix it rather than a book worm that THINKS HE KNOWS how to fix it.

                    Comment


                      #40
                      Andre,

                      How does the repair look when peering through the cubby openings?
                      De-stinking Penelope http://thegsresources.com/_forum/sho...d.php?t=179245

                      http://www.thegsresources.com/_forum...35#post1625535

                      Comment


                        #41
                        Originally posted by rustybronco View Post
                        Andre,

                        How does the repair look when peering through the cubby openings?
                        Dale,
                        The inside is either covered with a bead of slurry or with a strip of ABS sheeting. The long handled artists brushes made that quite easy from the inside. I have test fitted the flasher lights and they fit well.

                        Some building up with slurry, dry and sand to get level is still required as the slurry forms a dry scab very quickly as the acetone evaporates and if you disturb the surface it becomes uneven and thus easier to rather sand down slightly for a tidier finish.

                        Your cutting plan was perfect and made it quite easy to get together again!

                        Comment


                          #42
                          Originally posted by chuck hahn View Post
                          Way cool! Now it is starting to look more familiar! What color is it gonna be ?
                          Chuck,
                          Suzuki 08D Marble Lemans Blue. The colour it has now is very close to that. The Suzuki striping for that model and colour matches the Windjammer V decals very well, so those will go back on.
                          My work will probably grind to a halt as from this weekend onwards as the family start arriving for Christmas and new year.

                          Forming the windshield is going to be another challenge, but that will be next years worry!

                          Keep well.

                          Comment


                            #43
                            Originally posted by Matchless View Post
                            Your cutting plan was perfect and made it quite easy to get together again!
                            Andre,

                            As you well know, there were a lot of sleepless nights spent on 'both' our sides of the pond over this project. mine was 'mostly' spent on not handing over a piece of junk you could not work with and throwing your money down the drain; cutting it was the easy part.

                            additional comments...

                            a thin coat of 'good' automotive body filler applied to the 'visible' portions should level the surface nicely and remove the final pin holes in the slurry if need be.

                            apply tape on the textured surfaces where the slurry is applied from that side.
                            De-stinking Penelope http://thegsresources.com/_forum/sho...d.php?t=179245

                            http://www.thegsresources.com/_forum...35#post1625535

                            Comment


                              #44
                              Originally posted by Matchless View Post
                              It sands quite well and yes there should be no seam as you can see. Its just a bit of a slep having to wait a day or two for the slurry to dry before sanding.

                              I am planning to use my bikes OEM headlight which already has a H4 Silverstar in it. I have not tried to fit it with the Windjammer V type headlight shroud. Hope it will fit though! I will check that out, thanks.
                              I must actually remove that cable for the painting and will pop the spade connectors from the H4 plug anyway.
                              The OEM won't work, I tried it, that's why I gave the one from my parts bike to Dave8338. I bought a sealed beam replacement H4 from these people: http://store.candlepower.com/ca7inquhhe.html , fits right into the 'jammer headlight bucket perfectly and plugs into the sealed beam socket. No extra engineering required there. No plug adapters required either. The Candlepower people were real easy to work with as well.

                              Comment


                                #45
                                Originally posted by DanTheMan View Post
                                The OEM won't work, I tried it, that's why I gave the one from my parts bike to Dave8338.
                                Odd... my '80 Windjammer IV had the stock Stanley 7" H4 headlight capsule in it when first purchased. now it has a Bosch H4 in it.

                                Andre, I can include the Bosch capsule that came with that Windjammer in the next shipment if needed. let me know...
                                De-stinking Penelope http://thegsresources.com/_forum/sho...d.php?t=179245

                                http://www.thegsresources.com/_forum...35#post1625535

                                Comment

                                Working...
                                X