I found a small leak under one of the front "U brackets" which was plugged with epoxy and painted over. After the caustic soda bath it was easy to braze up both brackets as it had cleaned out the seams as well.
Announcement
Collapse
No announcement yet.
De-stinking Penelope
Collapse
X
-
 Matchless
Good start there Dale!
I found a small leak under one of the front "U brackets" which was plugged with epoxy and painted over. After the caustic soda bath it was easy to braze up both brackets as it had cleaned out the seams as well.
-
Forum LongTimerBard Award Winner
GSResource Superstar
Past Site Supporter- Jul 2005
- 15152
- Marysville, Michigan
Andre, As you can see through the petrol level gauge hole, I'm going to have to derust the tank and reline it after I remove the dents. So if there are small pin holes or areas that have the potential to be a leak source, hopefully my liner job will take care of them.
I still may boil the tank after I get done stripping it in order to get the paint removed from all those hard to reach areas. We'll see how the elbow grease method works first and then decide.
Comment
-
 Matchless
I will keep an eye on your posts when it comes to the removal of the liner as I am a complete ignoramus when it comes to tank lining (and many other things as well).
Keep those pictures coming!
Comment
-
Dale...i went to the dollor store and got the tooth brush looking brushes with the metal bristles..works a dream in the nooks and crannies.MY BIKES..1977 GS 750 B, 1978 GS 1000 C (X2)
1978 GS 1000 E, 1979 GS 1000 S, 1973 Yamaha TX 750, 1977 Kawasaki KZ 650B1, 1975 Honda GL1000 Goldwing, 1983 CB 650SC Nighthawk, 1972 Honda CB 350K4, 74 Honda CB550
NEVER SNEAK UP ON A SLEEPING DOG..NOT EVEN YOUR OWN.
I would rather trust my bike to a "QUACK" that KNOWS how to fix it rather than a book worm that THINKS HE KNOWS how to fix it.
Comment
-
Forum LongTimerBard Award Winner
GSResource Superstar
Past Site Supporter- Jul 2005
- 15152
- Marysville, Michigan
Andre, I bought a Quart of MEK to use for stripping the liner out with, followed by Etch And Prep to remove the rust and relined with Caswell's fuel tank sealer.Last edited by rustybronco; 06-14-2012, 01:12 AM.
Comment
-
Did the liner catch fire when you were doing the patch job?? Just curious as to how it reacted when the welding started..Last edited by chuck hahn; 06-13-2012, 11:20 AM.MY BIKES..1977 GS 750 B, 1978 GS 1000 C (X2)
1978 GS 1000 E, 1979 GS 1000 S, 1973 Yamaha TX 750, 1977 Kawasaki KZ 650B1, 1975 Honda GL1000 Goldwing, 1983 CB 650SC Nighthawk, 1972 Honda CB 350K4, 74 Honda CB550
NEVER SNEAK UP ON A SLEEPING DOG..NOT EVEN YOUR OWN.
I would rather trust my bike to a "QUACK" that KNOWS how to fix it rather than a book worm that THINKS HE KNOWS how to fix it.
Comment
-
Wonder what the liner is?? Seems it would have maybe flashed a bit or at least melted in some way...HMMMMY BIKES..1977 GS 750 B, 1978 GS 1000 C (X2)
1978 GS 1000 E, 1979 GS 1000 S, 1973 Yamaha TX 750, 1977 Kawasaki KZ 650B1, 1975 Honda GL1000 Goldwing, 1983 CB 650SC Nighthawk, 1972 Honda CB 350K4, 74 Honda CB550
NEVER SNEAK UP ON A SLEEPING DOG..NOT EVEN YOUR OWN.
I would rather trust my bike to a "QUACK" that KNOWS how to fix it rather than a book worm that THINKS HE KNOWS how to fix it.
Comment
-
Forum LongTimerBard Award Winner
GSResource Superstar
Past Site Supporter- Jul 2005
- 15152
- Marysville, Michigan
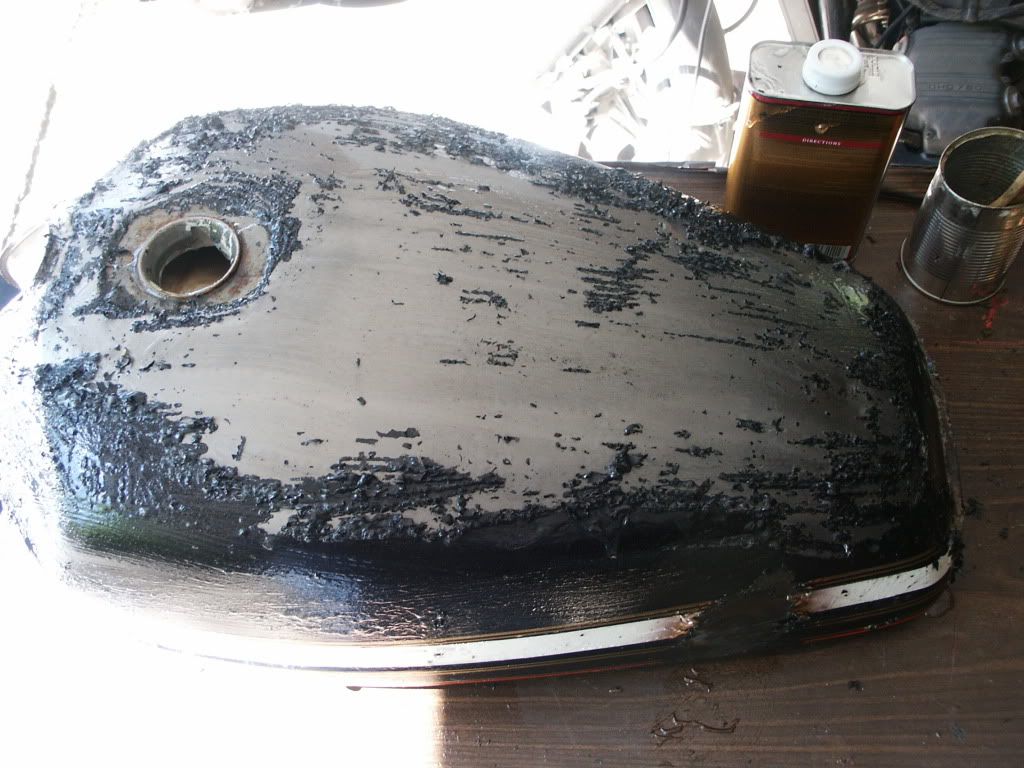
Chuck, the liner appears to be kreme. I took an air hose and a screwdriver to it and removed as much of the liner as I could before I started welding in that area.
Another day home from work with what I suspect is a case of food poisoning. (No Stan, it wasn't my cooking! so you're safe) While I was home, I did get a chance to get back at stripping the fuel tank. I need to get it in paint soon, as it might be harder to get access to the booth past the end of June. So now the race is on to get it base and mid coated by then.
 Last edited by rustybronco; 06-14-2012, 08:17 AM.
Comment
-
 Flyboy
Good work there Doc, sorry to hear you feeling crook, get well soon, and don't eat at strange $5 roadhouses.
Comment
-
Forum LongTimerBard Award Winner
GSResource Superstar
Past Site Supporter- Jul 2005
- 15152
- Marysville, Michigan
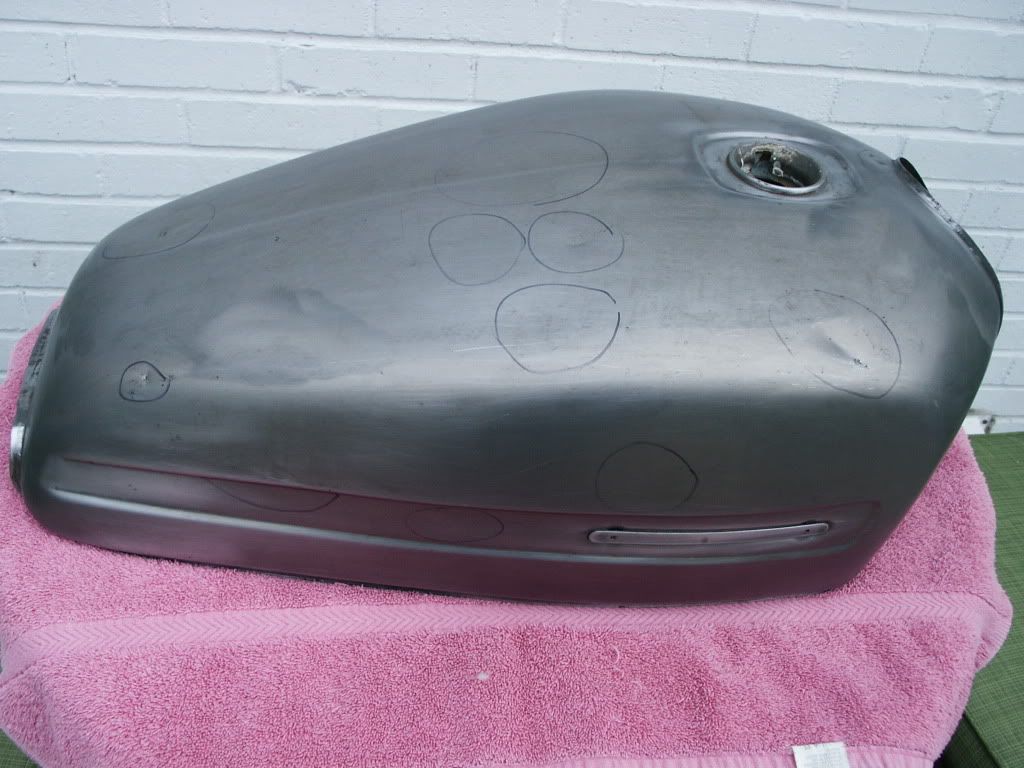
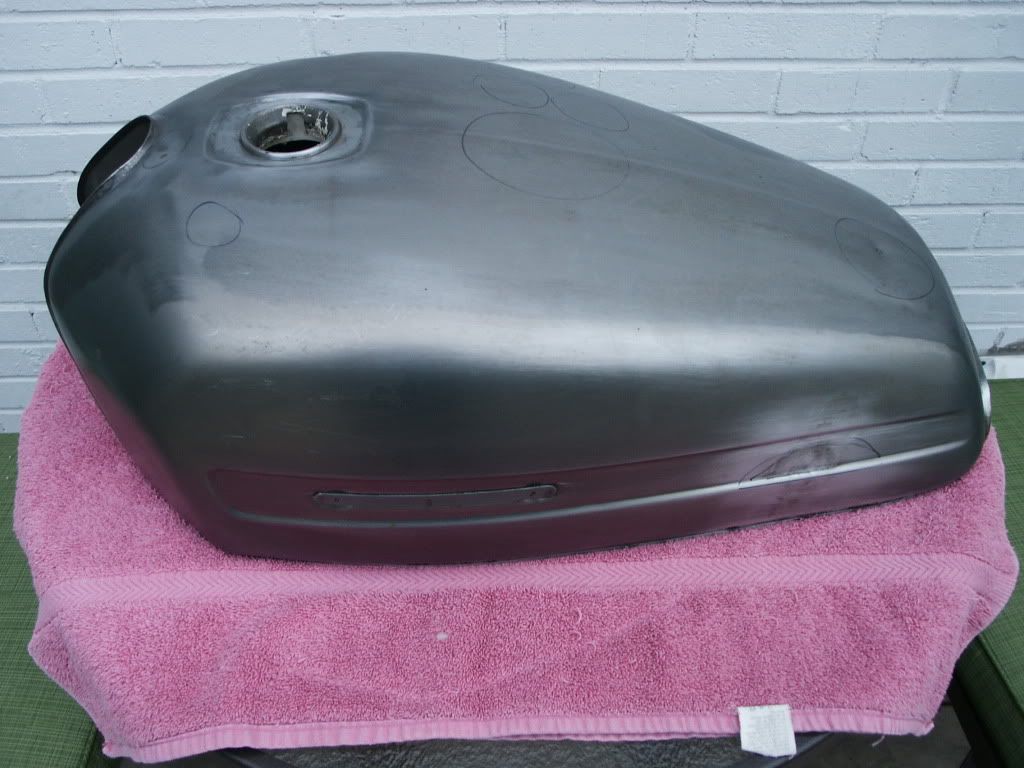
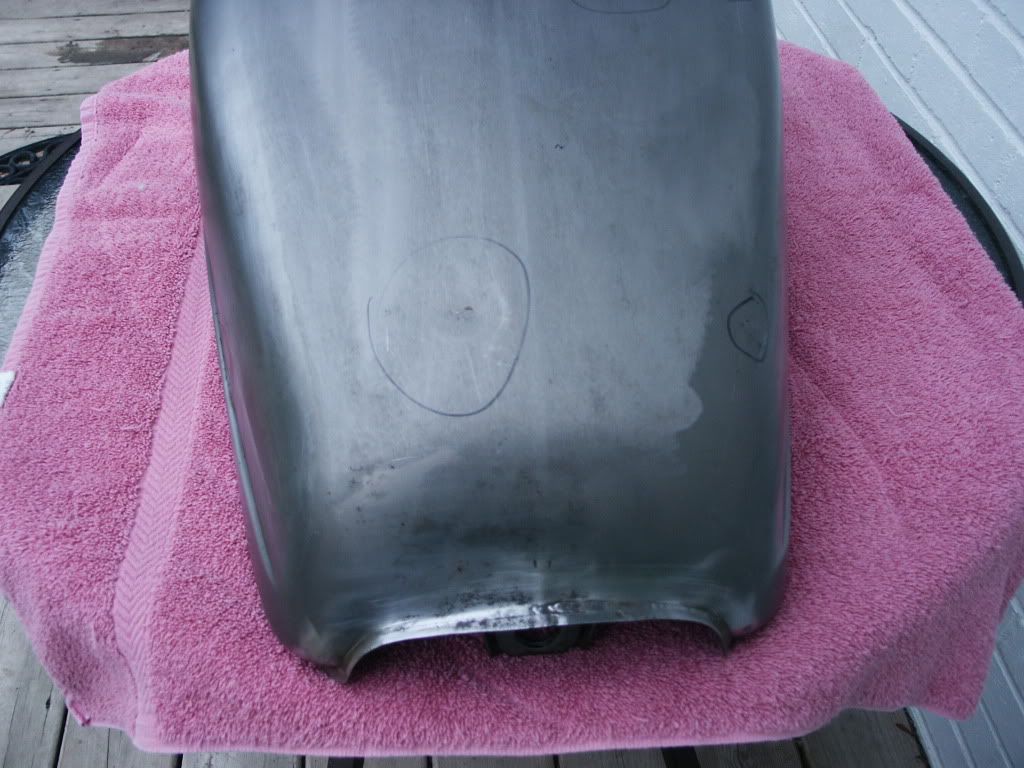
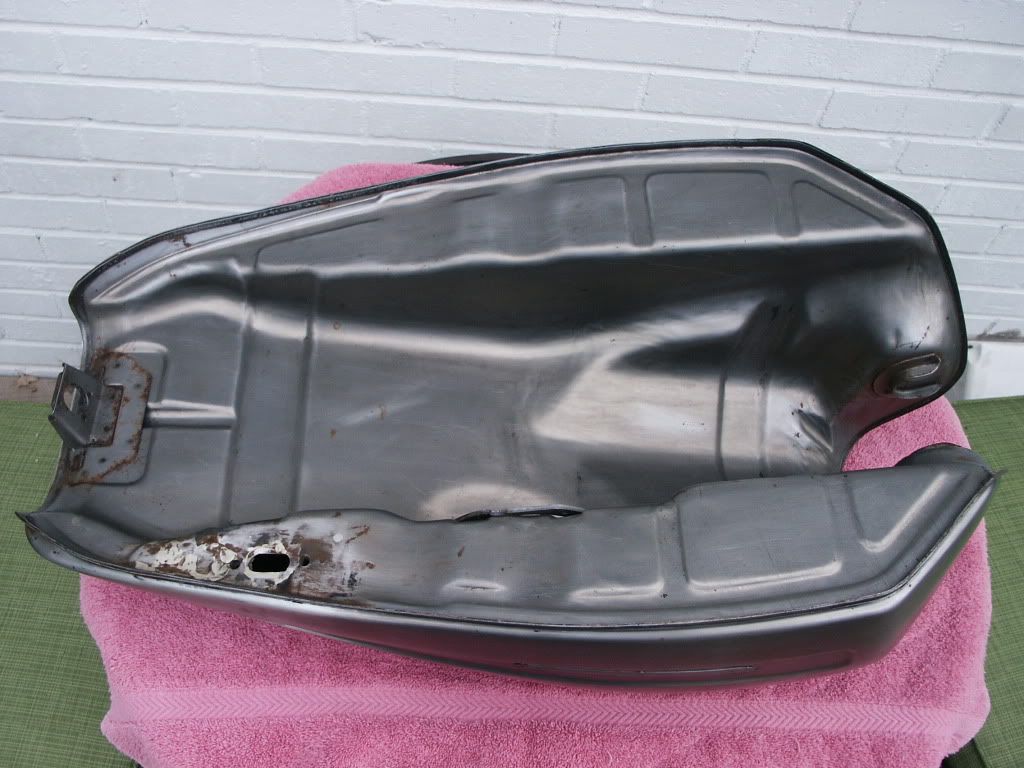
The paint is all removed and the metal looks pretty solid. That's something nice for a change.
There's a little surface rust that will need to be sand blasted, along with removal of a couple of the major dents before I can start stripping out the old liner. Tomorrow I'll make the block off plate for the petcock opening, find a plug to fit the filler opening and make a pick that will fit through the filler opening to help with the dent removal.
Nothing major, but lets just say it has a few spots that will need some filler applied.
Comment
-
 Matchless
Dale, it looks quite good in the pictures I must say.
Fortunately I could get a a wooden dowel to reach my dent and it came out nicely.
I
Here was mine at the time! Looking at yours it seems like yesterday!
Comment
-
Forum LongTimerBard Award Winner
GSResource Superstar
Past Site Supporter- Jul 2005
- 15152
- Marysville, Michigan
Andre, Lets just say that looks can be a bit deceiving.
There are numerous areas that will need filling as you can see. When I was running my hand over the tank last night looking for areas I could have missed on the first go around, I found a low section just below and slightly to left of centerline where those four circled areas are grouped together. Most of the damage can be fixed with a simple application of filler, but two of the dents are deep enough to have raised the metal around them. So, after dent removal, I might need to do a bit of shrinking on them.
You are a lucky man Andre, one dent and you didn't have to deal with rust on the inside of you tank. I wish I could have been just as lucky.
Comment
-
Forum LongTimerGSResource Superstar
Past Site Supporter
Super Site Supporter- Mar 2006
- 35617
- Torrance, CA
Those dents don't look too bad Dale. I think your bigger challenge is going to be getting out that old liner and derusting. I've used MEK before and while it does soften the Kreem, there were lots of tenacious spots that just didn't want to come off. I used paint stripper and found it more effective than the MEK. At any rate, you'll find out soon enough how tenacious that liner is going to be. Hope it cooperates and slides right off for you. Just for giggles you might want to ping some local radiator shops and ask them how much they would charge for a good boil out. The derusting and cleaning chemicals are not cheap so paying a shop isn't the worst thing you could do money wise.Ed
To measure is to know.
Mikuni O-ring Kits For Sale...https://www.thegsresources.com/_foru...ts#post1703182
Top Newbie Mistakes thread...http://www.thegsresources.com/_forum...d.php?t=171846
Carb rebuild tutorial...https://gsarchive.bwringer.com/mtsac...d_Tutorial.pdf
KZ750E Rebuild Thread...http://www.thegsresources.com/_forum...0-Resurrection
Comment
-
Forum LongTimerBard Award Winner
GSResource Superstar
Past Site Supporter- Jul 2005
- 15152
- Marysville, Michigan
Ed, they probably aren't all that bad, I'm just not one to bash the high spots down then fill em. The tank had a raised crease in one of the indentations that went away last night with a slight application of the body hammer. I had thought of spot welding studs on and pulling the deep ones, but because of the rusted insides I'm unsure of the metals thickness and didn't want to risk burning through. I guess I could fill it with water, but with rust already inside that didn't seem like a good idea. I may solder on a few nails and use them to pull the dents.
Fortunately (un?) for me most of the liner came off while I was trying to remove the mouse nest inside it. If someone had put a little more effort at removing the surface rust before they lined the tank, then I might consider having someone remove the coating. I guess I'll see how it goes first and then decide if it needs to be farmed out.Last edited by rustybronco; 06-19-2012, 09:43 AM.
Comment
.png)
Comment