Announcement

Collapse
No announcement yet.

1980 GS750L total rebuild from ground up to Cafe style

Collapse
X
 
  • Filter
  • Time
  • Show
Clear All
new posts

    #46
    Originally posted by nvr2old View Post
    I didn't know there was a filler that will stand up to the heat of powder coating. I've never heard of Alvins lab metal. Is it a product that can be sanded smooth to the point of scratches not showing up under powder coat..especially black..which reveals everything?
    Its great stuff! Yes, definitely can be sanded to give that nice finished look. If its done right itll never show, especially with black. Its not cheap but its the best out there... i used to use JB weld before i found lab metal...

    Comment


      #47
      Originally posted by NickyGS750 View Post
      So many little parts to keep track of, tedious cleaning... i cant be the only one who hates all these phillip head screws on these bikes... one major thing im changing... all the phillips screws into hex... make life easier.

      Have fun getting the throttle plates back on the shafts.

      The stock screws were staked into place to prevent them EVER coming out accidentally. Trying to get everything positioned so you can peen the ends of the screws will be loads of fun.

      The Allen-head (socket head) screw kits are nice, but they are usually just for the caps and bowls. Not sure if that kit includes the mounting rails.

      .
      sigpic
      mine: 2000 Honda GoldWing GL1500SE and 1980 GS850G'K' "Junior"
      hers: 1982 GS850GL - "Angel" and 1969 Suzuki T250 Scrambler
      #1 son: 1986 Yamaha Venture Royale 1300 and 1982 GS650GL "Rat Bagger"
      #2 son: 1980 GS1000G
      Family Portrait
      Siblings and Spouses
      Mom's first ride
      Want a copy of my valve adjust spreadsheet for your 2-valve per cylinder engine? Send me an e-mail request (not a PM)
      (Click on my username in the upper-left corner for e-mail info.)

      Comment


        #48
        Originally posted by Steve View Post
        Have fun getting the throttle plates back on the shafts.

        The stock screws were staked into place to prevent them EVER coming out accidentally. Trying to get everything positioned so you can peen the ends of the screws will be loads of fun.

        The Allen-head (socket head) screw kits are nice, but they are usually just for the caps and bowls. Not sure if that kit includes the mounting rails.

        .
        Oh yes i know haha itll be "fun".
        I think the one kit i found did include the rails... ill have to look again

        Comment


          #49
          Originally posted by Steve View Post
          Have fun getting the throttle plates back on the shafts.

          The stock screws were staked into place to prevent them EVER coming out accidentally. Trying to get everything positioned so you can peen the ends of the screws will be loads of fun.

          The Allen-head (socket head) screw kits are nice, but they are usually just for the caps and bowls. Not sure if that kit includes the mounting rails.

          .
          Couldn't he just use Locktite on the blade screws?
          :cool:GSRick
          No God, no peace. Know God, know peace.

          Eric Bang RIP 9/5/2018
          Have some bikes ready for us when we meet up.

          Comment


            #50
            Since no auto or parts store carries any valve spring compressor sets i had to improvise since im not waiting for shipping if i order one online.... so i made my own... easy. Time to take out some valves!


            YUP worked great!!


            Now time for cleaning! Whats the preference with the valve guide's, leave them in or taken em out, they look in great shape.


            Last edited by Guest; 02-26-2018, 08:14 PM.

            Comment


              #51
              Great idea on that tool, never would have thought of that!!!

              Comment


                #52
                Do not remove the guides unless you are replacing them. Just measure, they are probably within tolerance.
                1978 Gs1085 compliments of Popy Yosh, Bandit 1200 wheels and front end, VM33 Smoothbores, Yosh exhaust, braced frame, ported polished head :cool:
                1983 Gs1100ESD, rebuild finished! Body paintwork happening winter 2017:D

                I would rather trust my bike to a technician that reads the service manual than some backyardigan that THINKS HE KNOWS how to fix things.

                Comment


                  #53
                  Originally posted by Fjbj40 View Post
                  Do not remove the guides unless you are replacing them. Just measure, they are probably within tolerance.
                  Perfect, thank you!

                  Comment


                    #54
                    Nice orderly work areas. Very clean. Gives me some inspiration.

                    In your first post, the bike that is an example of the completed product--I was trying to pick out the things that make it different from some of the "craigslist funnies" abominations that feed our purist attitudes (because it is mostly pretty cool) and one thing is that the builder added a seat support (u-shape supporting the back few inches of the seat). The hack jobs just leave that off--too much work I guess. Anyway it's the details that make a modded bike a thing of beauty. Looks like you know what you are doing.
                    sigpic
                    1983 GS1100ES (Bought July 2014)
                    1983 GS1100E (Bought July 2014)
                    1985 GS700ES (Bought June 2015) Sold
                    On Christ the Solid Rock I Stand
                    All Other Ground is Sinking Sand

                    Comment


                      #55
                      Originally posted by NickyGS750 View Post
                      Since no auto or parts store carries any valve spring compressor sets i had to improvise since im not waiting for shipping if i order one online.... so i made my own... easy. Time to take out some valves!
                      I did pretty much the same thing, except I don't have a welder, so I used a 24mm deep socket and cut a window in the side.


                      Originally posted by NickyGS750 View Post
                      Whats the preference with the valve guide's, leave them in or taken em out, they look in great shape.
                      There is a member here by the name of "Nessism" who has some very good advice in his signature:

                      To measure is to know.
                      You don't necessarily have to get out the calipers and gauges, just hold the valve in the guide and wiggle it sideways to see if it moves too much. There should be virtually NO sideways movement.
                      Generally, they don't need to be replaced, but "stuff" does happen occasionally that requires that bit of work.

                      .
                      sigpic
                      mine: 2000 Honda GoldWing GL1500SE and 1980 GS850G'K' "Junior"
                      hers: 1982 GS850GL - "Angel" and 1969 Suzuki T250 Scrambler
                      #1 son: 1986 Yamaha Venture Royale 1300 and 1982 GS650GL "Rat Bagger"
                      #2 son: 1980 GS1000G
                      Family Portrait
                      Siblings and Spouses
                      Mom's first ride
                      Want a copy of my valve adjust spreadsheet for your 2-valve per cylinder engine? Send me an e-mail request (not a PM)
                      (Click on my username in the upper-left corner for e-mail info.)

                      Comment


                        #56
                        You can put a wadded up rag under the head in the combustion chamber area, put a socket of the appropriate size on top of the valve and hit the socket with a hammer. The keepers will pop out. Takes all of 10 seconds to remove a valve.
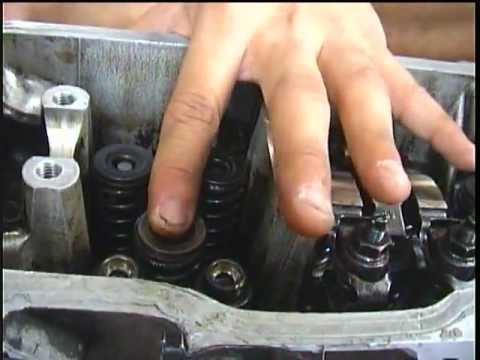
                        Last edited by gsrick; 02-27-2018, 01:46 AM.
                        :cool:GSRick
                        No God, no peace. Know God, know peace.

                        Eric Bang RIP 9/5/2018
                        Have some bikes ready for us when we meet up.

                        Comment


                          #57
                          Will follow this *subscribe*

                          Comment


                            #58
                            Originally posted by glib View Post
                            Nice orderly work areas. Very clean. Gives me some inspiration.

                            In your first post, the bike that is an example of the completed product--I was trying to pick out the things that make it different from some of the "craigslist funnies" abominations that feed our purist attitudes (because it is mostly pretty cool) and one thing is that the builder added a seat support (u-shape supporting the back few inches of the seat). The hack jobs just leave that off--too much work I guess. Anyway it's the details that make a modded bike a thing of beauty. Looks like you know what you are doing.
                            Thank you! It definitely helps.

                            Oh ive seen those too, its a shame... hopefully ill get that curved tail welded on here in a couple weeks, i really like that look... clean and doesn't take away from the bikes lines.

                            Comment


                              #59
                              Originally posted by Steve View Post
                              I did pretty much the same thing, except I don't have a welder, so I used a 24mm deep socket and cut a window in the side.
                              Definitely works! Ya i didnt feel like breaking out the welder, i just used that jb weld steel stick... sets up in minutes and drys in an hour. Did the trick.


                              Originally posted by Steve View Post
                              There is a member here by the name of "Nessism" who has some very good advice in his signature:
                              Ill have to find that, any info is great, thank you!


                              Originally posted by Steve View Post
                              You don't necessarily have to get out the calipers and gauges, just hold the valve in the guide and wiggle it sideways to see if it moves too much. There should be virtually NO sideways movement.
                              Generally, they don't need to be replaced, but "stuff" does happen occasionally that requires that bit of work.
                              Great to know, i do have a 1980 original service manual in my shop binder, it says to do a (if i recall, a 5.5mm reamer) in the guide. Any thoughts on that?

                              Comment


                                #60
                                Originally posted by gsrick View Post
                                You can put a wadded up rag under the head in the combustion chamber area, put a socket of the appropriate size on top of the valve and hit the socket with a hammer. The keepers will pop out. Takes all of 10 seconds to remove a valve.
                                Well i wish i knew that or saw that video before haha

                                Comment

                                Working...
                                X