Announcement

Collapse
No announcement yet.

GS450 Cafe / Fighter Style

Collapse
X
 
  • Filter
  • Time
  • Show
Clear All
new posts

    #31
    Todays update:

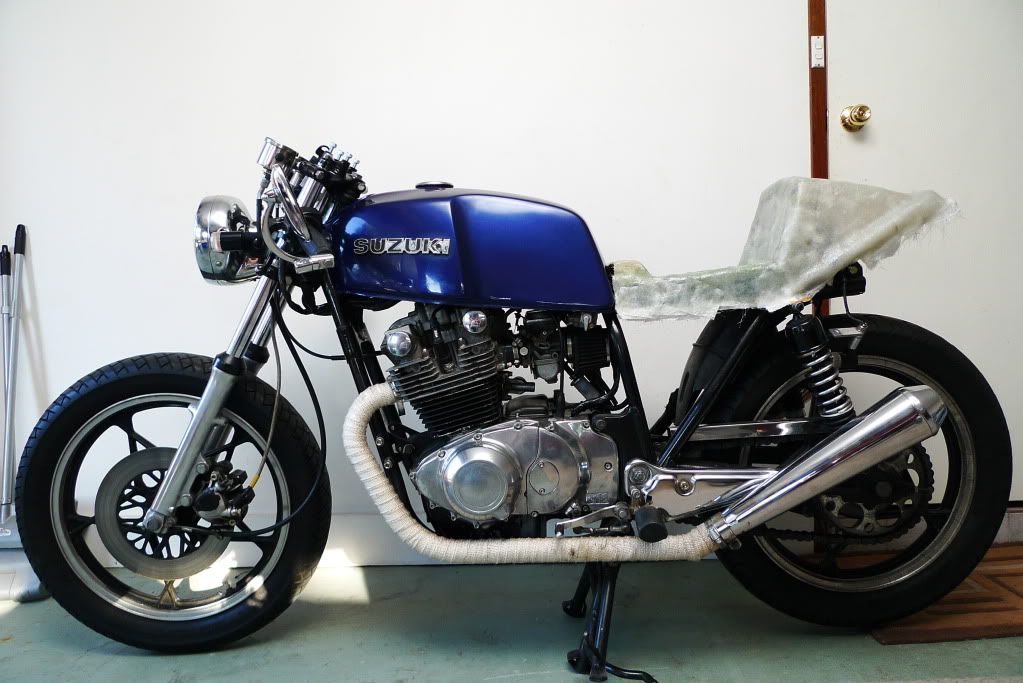
    Today was fibreglassing day and it seem to all go really well. The seat tail section moulded perfect and fits tight with the original pan. I'm yet to cut it out properly and do the underneath part but happy so far.

    Question for you experienced builders...

    Do I now sand before adding the body filler or just throw it on? I bough fibreglass body filler is that okay?

    Here is a photo with the new (not finished) tail section added.

    Comment


      #32
      Great job! I like the lines, you did a great job making everything flow well. Can't wait to see it completed.

      Comment


        #33
        Mate that looks like a good job! How many layers did you do?

        I'm far from an experienced builder, but I'll tell you what I did for my tail piece, although it's not structural...

        I did two layers of fibreglass over the wire mesh I had down for shape.

        I gave it a reasonable sand at that point so everything going on top of it would have a nice surface to bond to.

        Then I made a fibreglass filler of sorts (as suggested by Dale/rustybronco) which was basically chopped up matting mixed in with resin and hardener. That let me fill the really big low spots before putting the body filler on.

        After that came about four layers of fibreglass reinforced body filler to get it all nice and smooth. Note I sanded each layer.

        Then, finally, I used a touch of putty on the little odd bits here and there that still weren't quite right.

        Most of what I did is probably avoidable if you have a better base to start with than I did...
        1982 GS450E - The Wee Beastie
        1984 GSX750S Katana 7/11 - Kit Kat - BOTM May 2020

        sigpic

        450 Refresh thread: https://www.thegsresources.com/_foru...-GS450-Refresh

        Katana 7/11 thread: http://www.thegsresources.com/_forum...84-Katana-7-11

        Comment


          #34
          Originally posted by pete View Post
          And glad you took up Tim Tom's offer, he's awesome with that stuff and was the inspiration for my paint job as a result (thanks again Tim Tom!)
          Aww shucks guys . Although I do have to say I'm looking forward to seeing Collo post up the images we collaborated on. I think we've got a wicked fast looking bike in the works. Can't wait to see the real thing.

          The glass is looking good. I'd follow petes advice on how to finish it. His glass tail came out looking great.

          Comment


            #35
            Personally I like the color you have on the tank already. No need to screw up an already good paint job. The rest of it is looking really good.

            Comment


              #36
              Originally posted by Tim Tom View Post
              Aww shucks guys . Although I do have to say I'm looking forward to seeing Collo post up the images we collaborated on. I think we've got a wicked fast looking bike in the works. Can't wait to see the real thing.

              The glass is looking good. I'd follow petes advice on how to finish it. His glass tail came out looking great.
              I only speak the truth, you do good work!

              Come on Collo, I wanna see them!

              And cheers Tim Tom, I found a few dots here and there after painting that could've done with a spot of putty but only one is really noticeable as it's right in the middle of the white stripe... oh well, I'm still happy with it

              Originally posted by Smokinapankake View Post
              Personally I like the color you have on the tank already. No need to screw up an already good paint job. The rest of it is looking really good.
              Actually I gotta say I love that blue too...
              1982 GS450E - The Wee Beastie
              1984 GSX750S Katana 7/11 - Kit Kat - BOTM May 2020

              sigpic

              450 Refresh thread: https://www.thegsresources.com/_foru...-GS450-Refresh

              Katana 7/11 thread: http://www.thegsresources.com/_forum...84-Katana-7-11

              Comment


                #37
                Thanks for the comments guys. I'm not so good at using the 'quote' tool yet for multiple posts so I'll try and answer any questions.

                I used a whole large bucket of the fibreglass repair kit from Bunnings, it might have been overkill but is super strong and quite thick. I think it was 1m2 in total - worked out to about 3/4 layers. Thanks for the tips on body filler too, I'll be doing that soon, maybe even today.

                And yes, a big thanks to Tim Tom for his help in colour scheming the bike. I don't know how you do it, but it looks great in either colour. So here they are:


                The original blue is nice, but it's quite chipped and I would need to pint the tail anyways then have to match it... It just seemed easier to start fresh.

                Comment


                  #38
                  Cool, Tim Tom certainly knows how to wield a mouse!

                  Both schemes look good, but of course I'm biased and would pick the second one because blue is one of my favourite colours... haha

                  I used the same kit from Bunnings except I used about a quarter of it.

                  The body filler will add extra strength as well.
                  1982 GS450E - The Wee Beastie
                  1984 GSX750S Katana 7/11 - Kit Kat - BOTM May 2020

                  sigpic

                  450 Refresh thread: https://www.thegsresources.com/_foru...-GS450-Refresh

                  Katana 7/11 thread: http://www.thegsresources.com/_forum...84-Katana-7-11

                  Comment


                    #39
                    Originally posted by Collo View Post
                    I'm not so good at using the 'quote' tool yet for multiple posts so I'll try and answer any questions.
                    Doing multiple quotes is just as easy as single quotes.

                    Instead of hitting the QUOTE button, use the smaller button beside it that only has the quote marks. When you press it, you will see it turn red to show that it is selected. Move to the next post you want to quote, do the same thing. When you are done selecting posts, hit the Post Reply button, you will see all your selected quotes.

                    Note that you don't have to use the entire statement. You will see at the top of my post that I edited out what was not relevant. Just make sure the stuff inside the brackets remains intact, both before and after the quote.

                    By the way, you are doing a FINE job on posting pictures. They are a convenient size and you are putting a blank line between them as a border.

                    .
                    sigpic
                    mine: 2000 Honda GoldWing GL1500SE and 1980 GS850G'K' "Junior"
                    hers: 1982 GS850GL - "Angel" and 1969 Suzuki T250 Scrambler
                    #1 son: 1986 Yamaha Venture Royale 1300 and 1982 GS650GL "Rat Bagger"
                    #2 son: 1980 GS1000G
                    Family Portrait
                    Siblings and Spouses
                    Mom's first ride
                    Want a copy of my valve adjust spreadsheet for your 2-valve per cylinder engine? Send me an e-mail request (not a PM)
                    (Click on my username in the upper-left corner for e-mail info.)

                    Comment


                      #40
                      Originally posted by Steve View Post
                      Doing multiple quotes is just as easy as single quotes.

                      Instead of hitting the QUOTE button, use the smaller button beside it that only has the quote marks. When you press it, you will see it turn red to show that it is selected. Move to the next post you want to quote, do the same thing. When you are done selecting posts, hit the Post Reply button, you will see all your selected quotes.

                      Note that you don't have to use the entire statement. You will see at the top of my post that I edited out what was not relevant. Just make sure the stuff inside the brackets remains intact, both before and after the quote.

                      By the way, you are doing a FINE job on posting pictures. They are a convenient size and you are putting a blank line between them as a border.

                      .
                      Ha! You learn something new every day... I didn't know that either Steve! Just used it for this single quote

                      I've been hitting the Quote button to open in a new tab and copy/pasting all my multiple quote replies... thanks
                      1982 GS450E - The Wee Beastie
                      1984 GSX750S Katana 7/11 - Kit Kat - BOTM May 2020

                      sigpic

                      450 Refresh thread: https://www.thegsresources.com/_foru...-GS450-Refresh

                      Katana 7/11 thread: http://www.thegsresources.com/_forum...84-Katana-7-11

                      Comment


                        #41
                        Originally posted by Steve View Post
                        Doing multiple quotes is just as easy as single quotes.

                        Instead of hitting the QUOTE button, use the smaller button beside it that only has the quote marks. When you press it, you will see it turn red to show that it is selected. Move to the next post you want to quote, do the same thing. When you are done selecting posts, hit the Post Reply button, you will see all your selected quotes.

                        Note that you don't have to use the entire statement. You will see at the top of my post that I edited out what was not relevant. Just make sure the stuff inside the brackets remains intact, both before and after the quote.

                        By the way, you are doing a FINE job on posting pictures. They are a convenient size and you are putting a blank line between them as a border.

                        .
                        Thanks Steve, I'll practice that now. It's much easier.

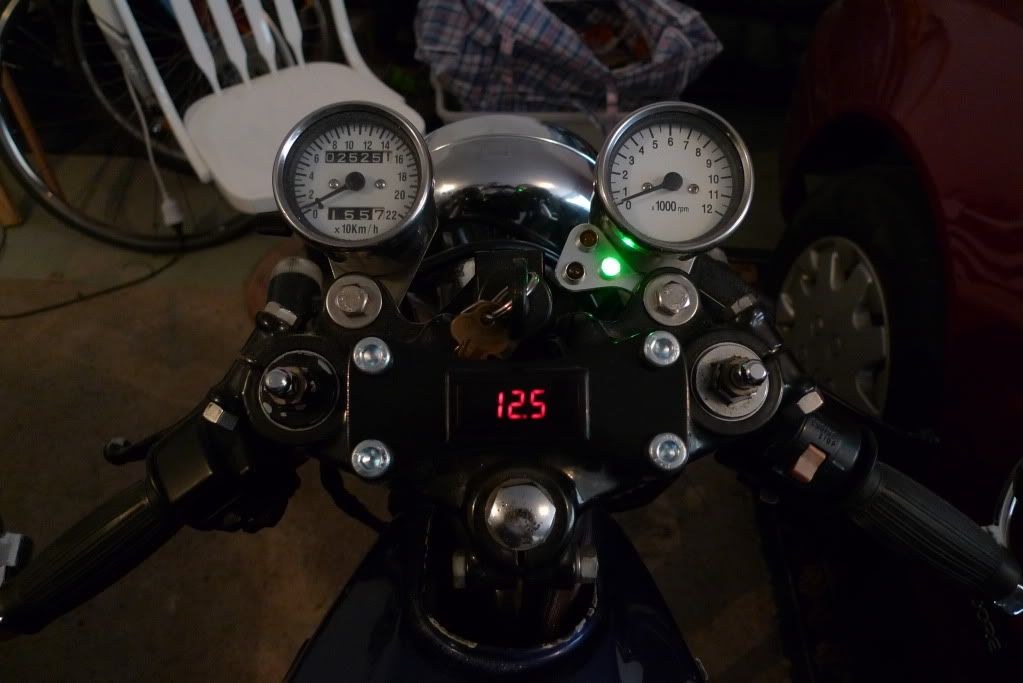
                        Today is voltmeter install day. I've read on another post somewhere that there is a feee brown wire in the headlight loom; well, I don't have said wire so can someone help me out where to connect a positive?

                        I was thinking somewhere that shows a good reading of what the charging unit is doing? Although, I would prefer not to take the tank off and run wires along the whole length of the bike as the meter will be on the forks.

                        And someone good with forum etiquette, should I post questions like these in the electrical forum or on my build...?

                        Comment


                          #42
                          Originally posted by Collo View Post
                          I've read on another post somewhere that there is a feee brown wire in the headlight loom; well, I don't have said wire so can someone help me out where to connect a positive?
                          That brown wire might have been a "feature" limited to the larger bikes.

                          I don't remember seeing one in the couple of 550s I have worked on, and I don't see it on the 650 wiring diagram, so it might be for 750 and up.

                          .
                          sigpic
                          mine: 2000 Honda GoldWing GL1500SE and 1980 GS850G'K' "Junior"
                          hers: 1982 GS850GL - "Angel" and 1969 Suzuki T250 Scrambler
                          #1 son: 1986 Yamaha Venture Royale 1300 and 1982 GS650GL "Rat Bagger"
                          #2 son: 1980 GS1000G
                          Family Portrait
                          Siblings and Spouses
                          Mom's first ride
                          Want a copy of my valve adjust spreadsheet for your 2-valve per cylinder engine? Send me an e-mail request (not a PM)
                          (Click on my username in the upper-left corner for e-mail info.)

                          Comment


                            #43
                            Originally posted by Steve View Post
                            That brown wire might have been a "feature" limited to the larger bikes.

                            I don't remember seeing one in the couple of 550s I have worked on, and I don't see it on the 650 wiring diagram, so it might be for 750 and up.

                            .
                            Yeh I had another look before but couldn't find it. There was another wire that powered when ignition was switched so I hacked into that a little. Here is the progress, just need to fire the bike up to see it working properly.

                            Comment


                              #44
                              sweet looking dash!

                              Comment


                                #45
                                Originally posted by Collo View Post
                                Thanks Steve, I'll practice that now. It's much easier.

                                Today is voltmeter install day. I've read on another post somewhere that there is a feee brown wire in the headlight loom; well, I don't have said wire so can someone help me out where to connect a positive?

                                I was thinking somewhere that shows a good reading of what the charging unit is doing? Although, I would prefer not to take the tank off and run wires along the whole length of the bike as the meter will be on the forks.

                                And someone good with forum etiquette, should I post questions like these in the electrical forum or on my build...?
                                I generally ask questions in my rebuild thread but if it's something either I'm not getting replies to or it's very specific and warrants it I'll start a thread in the appropriate place, like my paint thread for eg.

                                Originally posted by Collo View Post
                                Yeh I had another look before but couldn't find it. There was another wire that powered when ignition was switched so I hacked into that a little. Here is the progress, just need to fire the bike up to see it working properly.

                                Mate that looks great! Love what you've done with the instruments and idiot lights etc.

                                I forgot to ask what you did for a headlight? Is it still a 7" job? I'm struggling to find one for a reasonable price that will pass a safety certificate inspection...
                                1982 GS450E - The Wee Beastie
                                1984 GSX750S Katana 7/11 - Kit Kat - BOTM May 2020

                                sigpic

                                450 Refresh thread: https://www.thegsresources.com/_foru...-GS450-Refresh

                                Katana 7/11 thread: http://www.thegsresources.com/_forum...84-Katana-7-11

                                Comment

                                Working...
                                X