Announcement

Collapse
No announcement yet.

Another Aussie GS rebuild - GS1100G

Collapse
X
 
  • Filter
  • Time
  • Show
Clear All
new posts

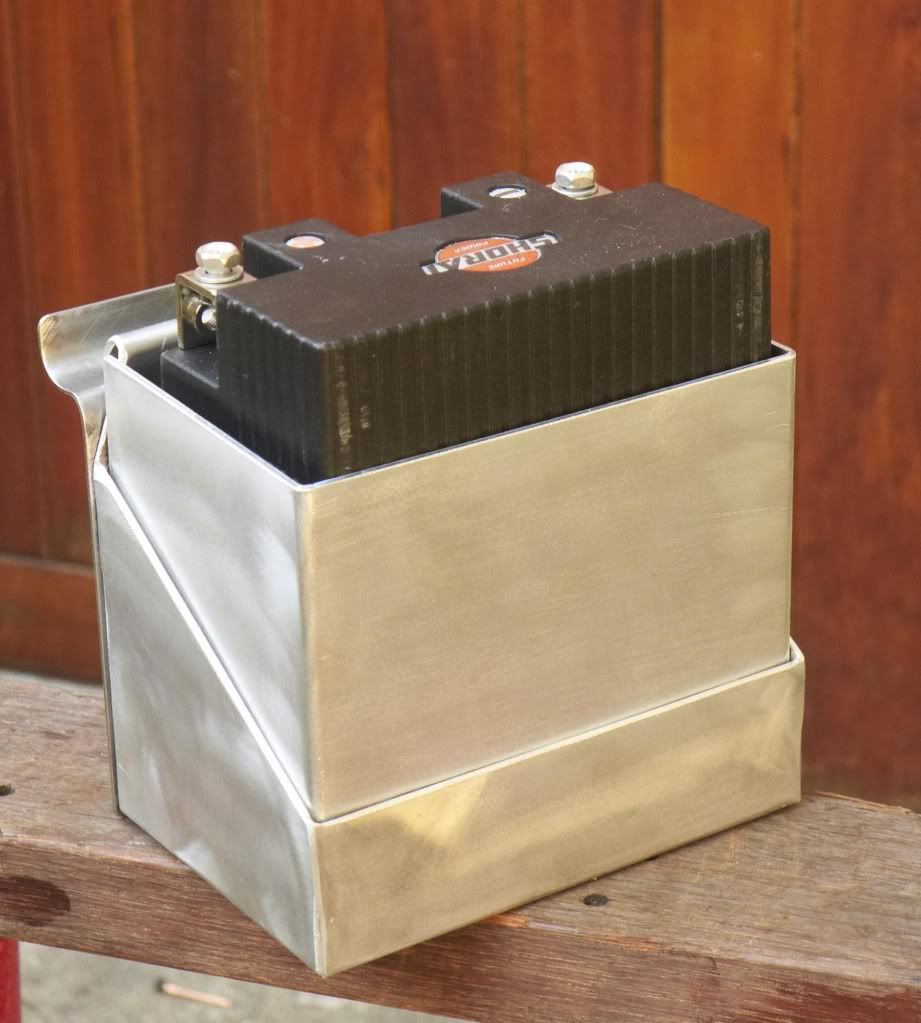
    Well here it is - the exciting battery box:


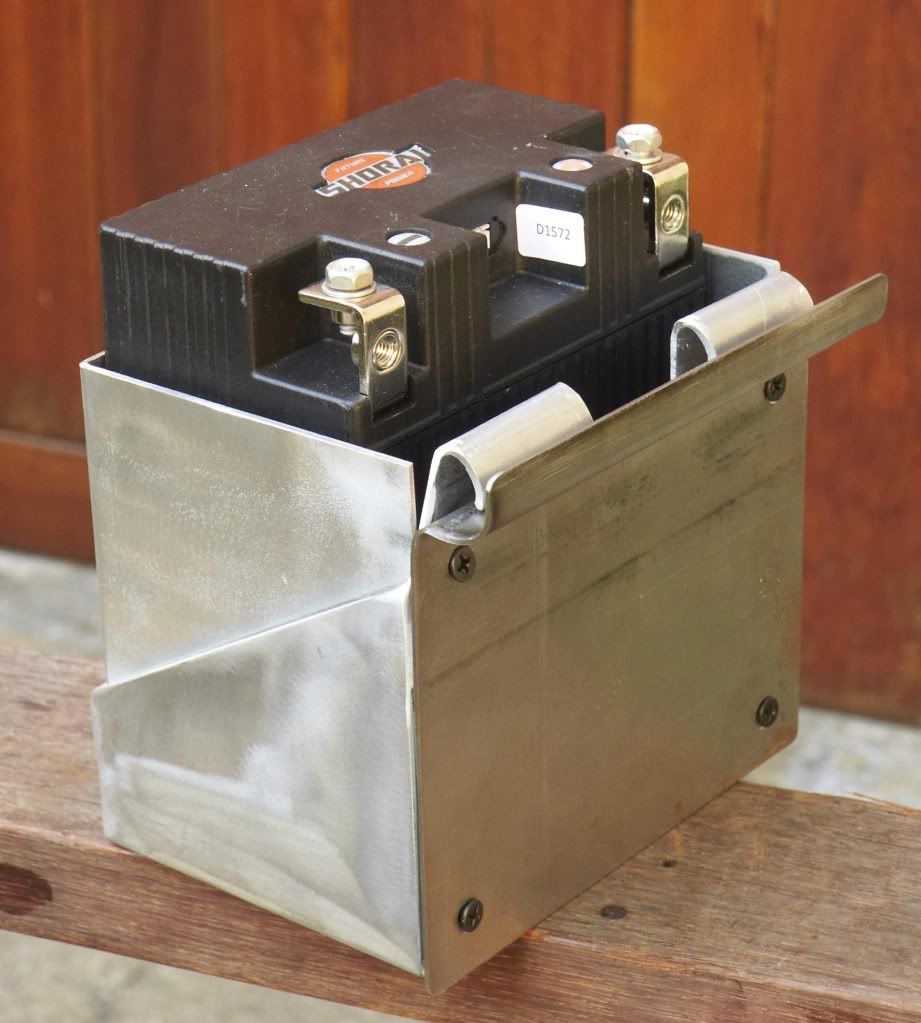
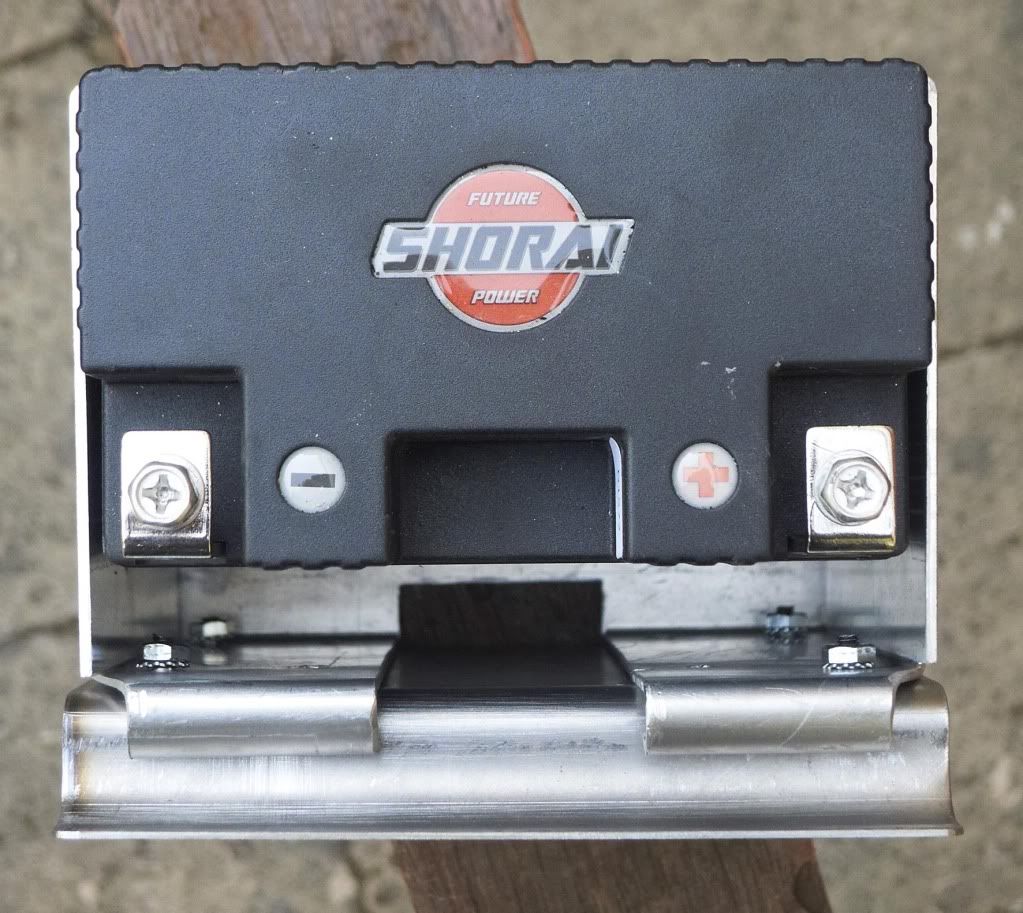
    And here you can see the space where the wiring goes.


    It will all be powdercoated texture black except the insert which covers the battery which will be satin anodised, hopefully matching the fenders if I can sort out the finish.

    With each day that passes I am liking it more and more since I chopped it. I reeeeeealy want to ride it now!

    Comment


      Nice one Jimmy, you should see my dodgy battery box cover I'm working on... Not gonna be anywhere as pretty as that!
      1982 GS450E - The Wee Beastie
      1984 GSX750S Katana 7/11 - Kit Kat - BOTM May 2020

      sigpic

      450 Refresh thread: https://www.thegsresources.com/_foru...-GS450-Refresh

      Katana 7/11 thread: http://www.thegsresources.com/_forum...84-Katana-7-11

      Comment


        Well I first made it up out of cardboard to check fit then took it to a local aluminium fabricator and they bent it out of sheet for me for a carton of Carlton midstrength. I did the steel backplate though.

        Today I went to buy some steel for the rear frame loop and some little frame tabs to attach my new bits to. There is a steel shop not far from me that I love going to because the guy who works there can't be bothered to work out how much my tiny orders should cost. So he just says "$10". So I got a generous amount of steel for my $10 today!

        So then while I was in the area I stopped off at an exhaust fabrication shop and asked if they could bend 25mm steel tube. I don't have a pipe bender. But they had a bender for 25mm tube, as long as a 6" bend was ok! So I thought considering that the tubing cost me all of $5 it couldn't hurt to try a bend as long as it didn't go the full 180 degrees. As it happens it's not too far off the radius of the back of my seat. So tomorrow I'm going back there to see if he can just curl the ends a bit for me to pull it in to 240mm outside so I can match it to my frame. I've cut the loop to size and just need the ends curled in a little. Should match my seat really well. And it was free.

        I love doing this stuff!

        Comment


          Awesome Jimmy! Sounds like you're rockin' on
          1982 GS450E - The Wee Beastie
          1984 GSX750S Katana 7/11 - Kit Kat - BOTM May 2020

          sigpic

          450 Refresh thread: https://www.thegsresources.com/_foru...-GS450-Refresh

          Katana 7/11 thread: http://www.thegsresources.com/_forum...84-Katana-7-11

          Comment


            Originally posted by JimmyR View Post
            Well I first made it up out of cardboard to check fit then took it to a local aluminium fabricator and they bent it out of sheet for me for a carton of Carlton midstrength. I did the steel backplate though.

            Today I went to buy some steel for the rear frame loop and some little frame tabs to attach my new bits to. There is a steel shop not far from me that I love going to because the guy who works there can't be bothered to work out how much my tiny orders should cost. So he just says "$10". So I got a generous amount of steel for my $10 today!

            So then while I was in the area I stopped off at an exhaust fabrication shop and asked if they could bend 25mm steel tube. I don't have a pipe bender. But they had a bender for 25mm tube, as long as a 6" bend was ok! So I thought considering that the tubing cost me all of $5 it couldn't hurt to try a bend as long as it didn't go the full 180 degrees. As it happens it's not too far off the radius of the back of my seat. So tomorrow I'm going back there to see if he can just curl the ends a bit for me to pull it in to 240mm outside so I can match it to my frame. I've cut the loop to size and just need the ends curled in a little. Should match my seat really well. And it was free.

            I love doing this stuff!
            The "sickness" has set in.

            Great looking work.

            Comment


              A thought for attaching the frame loop

              Hi Jimmy, if you don't mind I have had a thought to maybe help you attach the frame loop(I've been following the progress and it looks great).Get the loop that you got fabricated and drill a hole(say8-9mm)through the inside wall of the tube on both sides of the loop where you want to attach to the frame,then drill 2 holes(of the same diameter) roughly 30mm apart in the inside of the main cradle of the frame,get 2 pieces of solid bar that is a good internal fit for both the loop and the frame then push it up the loop on each open end( that will sit against the frame) until it can be seen covering the holes you drilled in the loop, then simply weld up the holes again -this will attach the bar to the loop,then when you go to attach the loop to the frame it has a solid anchor point,push the loop into the frame until you cover the holes you drilled and weld them as well but leave 1-2mm of the bar showing so when you weld you join the bar,loop and frame with 1 weld,this method may sound complicated(and as I type this, it is to me!!!) but you are reinforcing the loop and frame also you can grind the welds flush on the tubing of the frame and loop(where you drilled the holes)WITHOUT compromising the strength of the frame-aw to hell with this, I'll just draw some sketches to give you the idea,hope you haven't gone to sleep trying to read this,Johnny

              Comment


                Oddly enough I understand what you said completely! I had thought of doing something similar - but using either smaller diameter tubing or solid plugs. Good idea about the slight gap for the weld, although depending on how it's welded you may not need it.

                The only reason I might not do that is that the add-on will be at an angle to the frame rails as the seat tilts up at that point. The other tricky bit is that I really need not only to curve the loop to go from one side of the frame to the other, but also slightly upwards to follow the curve of the seat.

                Comment


                  The battery box is beautiful. Did you make it?
                  Might I suggest that you place some weatherstrip foam or rubber of some kind over the exposed bolts/threads?
                  And perhaps some kind of rubber band such as the factory does to secure the battery from moving?
                  Also make sure that you have some kind of rubber under the battery to absorb the vibrations that will kill a battery.


                  Eric

                  Comment


                    There are a couple of reasons for the gap,1:cosmetic,it's easier to have a flush finish to the tubes(after grinding) meaning that when the frame is powdercoated you don't have an ugly lump left sitting on the join alerting the jobsworth dimwits who are employed to give vehicles their annual inspection that you've changed the rear of the bike,2:chemical, with butt joints where you only weld one side of the material it could possibly weaken with vibration and break causing your bum,seat,fender and taillight assembly to slowly shuffle backwards off the bike,leaving you getting a crack and sack wax before you get yer bum sanded with the road, any welder will tell you that a gap of approx. 1/2 the size of the material to be welded will give a much stronger job any plate over 4mm is required by law to have what is called an "edge prep" ie. a chamfer not exceeding 60 degrees and a weld gap of 2.5mm to allow good penetration-I'm assuming that the tube you have for the loop is around 0.8-1.0mm wall which can be easily bent cold if you put the bottom loop in a vice with either soft jaws or a couple of pieces of wood and larger dia pipe put over the open ends(if you want to ensure both ends are bent at the same angle get the bigger tubes,and weld a piece across the top so you can hold the middle piece but still bend both tubes at the same time), you could also bend the solid bar to meet the bend you require and just chamfer the ends of the pipe to give you the gap,I know I am droning on about that but it is important-promise!!!!

                    Comment


                      Mr 7981GS - The main bit of the box I got a local aluminium place to make for me - I gave them my cardboard mockup with dimension written on it and they bent it up and welded the corners for me - all for the cost of a case of beer. I had to then curl the top edge around to hang off the frame. I also made the back plate which is steel to cover the hole I made to route the wiring. Then I tidied it all up with a grinder and last a wire brush.

                      Johnny - the guy I use to do my welding is a pommy guy who knows his stuff. For a pom he is a top bloke! :-) I've known him for years because we are both musos and used to hang in the same original music scene where I live. 20-odd years later and we bump into each other when I'm doing some building on my house - he comes and does all my steel windows. Apparently bike racing looms large in his family history. His grandmother was the first woman in England to hold a record in some kind of motorbike racing. I'll have to find out more.

                      Anyway, the bit I'm adding to the frame isn't going to be doing much. The seat is supported by existing frame, the tail light is mounted onto the fender and the indicators to existing frame. But don't worry - I don't want either the frame to crack or some busybody to wonder if my bike is kosher.

                      Comment


                        Oh, and Johnny - FWIW the stock frame tubing at the rear where I chopped is 26mmOD, 22mmID so wall thickness is 2mm. Closest I could get was 25mmOD with a 1.6 wall thickness. By the time it's welded and smoothed I doubt you'd notice, esp as they join at an angle.

                        Comment


                          Can't wait to see it completely finished! Great job so far!

                          Comment


                            Originally posted by JimmyR View Post

                            Johnny - the guy I use to do my welding is a pommy guy who knows his stuff. For a pom he is a top bloke! :-).

                            I don't want either the frame to crack or some busybody to wonder if my bike is kosher.
                            I've done some research and will now translate for all the Yanks:

                            Yanks: A shortened form of Yankee, a slang term for someone of American origin or heritage....

                            Pommy: The term pommy, pom or pomme, in Australia, New Zealand and South Africa, commonly denotes a person of British (usually of English heritage) origin.

                            Kosher: Satisfying the requirements of Jewish law.


                            Comment


                              Originally posted by Good Times View Post
                              I've done some research and will now translate for all the Yanks:

                              Yanks: A shortened form of Yankee, a slang term for someone of American origin or heritage....

                              Pommy: The term pommy, pom or pomme, in Australia, New Zealand and South Africa, commonly denotes a person of British (usually of English heritage) origin.

                              Kosher: Satisfying the requirements of Jewish law.


                              I thought you Aussi's called Brits "Nigels"... hahaha.

                              Comment


                                You know Jimmy, with your other thread about the breather hose... you should get the alu. guys to make you a little blow by box with a tap in the bottom and get it so you can stick one of those Supercheap filters like I got on top... wire brush the alu. and it will really look the part in the empty space behind the pods if you do it right... just a thought anyway

                                Also, talking to the Mrs tonight and it looks like the holiday we were planning for her birthday in May may be changing destination from Melbourne to Fremantle... so if that's the case then look out! Obviously won't be bringing the 450 over though...
                                1982 GS450E - The Wee Beastie
                                1984 GSX750S Katana 7/11 - Kit Kat - BOTM May 2020

                                sigpic

                                450 Refresh thread: https://www.thegsresources.com/_foru...-GS450-Refresh

                                Katana 7/11 thread: http://www.thegsresources.com/_forum...84-Katana-7-11

                                Comment

                                Working...
                                X